There are Docker commands that can be used to manage containers, images, networks, and various other objects. These are single Docker objects and are relatively easy to manage. However, in a microservices architecture, even a single application contains hundreds of containers/nodes/servers that must communicate with one another on a single network. Now, Checkout these best docker-compose commands with this blog post. Although Docker has provided us with technologies like Docker Networks and Swarms, there’s still a missing element that should allow users to run multi-container applications with ease and dynamically manage these containers within a single framework. This is where Docker Compose comes in.
What is Docker Compose?
Docker-compose allows us to bootstrap complex multi-container applications, maintain their dependencies, create a network of these containers, and even scale the whole application to as many containers as we want. Compose is a Docker module that allows us to define and run multi-container Docker applications. We can customize our application's resources allotment with a Compose file using a YAML format. Then, we can build and start all of the resources from a single host with a single instruction. To move ahead with this article, you should have a basic understanding of docker and docker-compose and they should be installed in your host machine. We will start with a basic explanation of the docker-compose file and explain each of the Docker Compose commands with a hands-on example.
What is a docker-compose file?
Docker Compose files are used to specify instructions and are basically a single docker-compose.yml configuration file. Below is the typical format of a docker-compose.yaml file.
version: 'X'
services:
    service_1:
    build: .
    ports:
      - "5000:5000"
    volumes:
      - .:/code
    service_2:
        image: image_name
Let’s discuss each component.
- Version : It indicates that we are using Docker Compose version X, and Docker will have all the required functionalities corresponding to that version.
- Services : It lays details of all the containers that will make up our Docker compose the structure. In the above example, we have two services - service 1 and service 2. The services can be any docker container like a web-server or a NodeJs backend or a database.
- Build : It is used to specify the location of the docker-compose.yml and Dockerfile. If . (dot) is specified, it denotes the current directory.
- Port : It is used to define the port mappings of our service to the local machine ports.
- Volumes : It is similar to Docker's -v option. We can connect our code repository in the local machine to the containers' ./code directory in this case. If modifications are made to any of the code files, we won't have to restore the images.
- Links : This is used to link two services together. We can define which containers to be linked together in the bridge network.
- Image : We can use it to define the image location in case we don't have a Dockerfile. We can use it to run a service using a pre-built image. From that image, Compose will create a container.
Now, let’s spin up a multi-container docker application and learn the basic Docker Compose commands using it.
Docker Compose
In this example, we will try to build a basic Python web application that runs on Docker Compose. This application will be built with the Python Flask framework and use a Redis Image to keep track of the number of visits to the website. Let’s first create a directory and a file named app.py . This file will contain all the code related to our flask application.
import time
import redis
from flask import Flask

app = Flask(__name__)
cache = redis.Redis(host='redis', port=6379)

def get_hit_count():
    retries = 5
    while True:
         try:
             return cache.incr('hits')
         except redis.exceptions.ConnectionError as exc:
             if retries == 0:
                 raise exc
             retries -= 1
             time.sleep(0.5)

@app.route('/')
def hello():
    count = get_hit_count()
    return 'Hello World! I have been seen {} times.\n'.format(count)
Next, we need to create a requirements.txt file that will include all the modules and packages that we would need to run our application. Here, we only need flask and Redis packages. Hence, we define these inside the file. In our application, we have used the Redis module which is used to connect with the Redis database service. It has a hostname called redis and runs on its default port which is 6379. Next, we can move ahead and create a dockerfile for our flask application. There, we can specify the dependencies and other configurations.
Dockerfile
FROM python:3.7-alpine

WORKDIR /code

ENV FLASK_APP=app.py
ENV FLASK_RUN_HOST=0.0.0.0

RUN apk add --no-cache gcc musl-dev linux-headers

COPY requirements.txt requirements.txt

RUN pip install -r requirements.txt

EXPOSE 5000
COPY . .
CMD ["flask", "run"]
Let us briefly go through what the above dockerfile does. We pull a python:3.7 base image from Dockerhub and then change the default working directory to the /code directory inside the container. Post that, we have used the ENV instructions to set the environment variables that the flask command would need. To install dependencies such as gcc, musl-dev, etc., we have used the apk add command along with the RUN instruction. Next, we have installed the modules that we had included in the requirements.txt. We will be running the app on port 5000. Hence, we have used the EXPOSE instruction to expose this port of the container. Next, we have used the COPY instruction to copy the build context which is the current directory in our host machine to the default working directory in the container. Finally, we have used the CMD instruction to define which command needs to be executed when we run the container. Since we need to run the flask application, we have used the “flask run” command.
Docker-Compose File
Now, it’s time to create our docker-compose.yaml file.
version: "3.9"
services:
  web:
build: .
ports:
   - "5000:5000"
  redis:
image: "redis:alpine"
Here, we have defined two services called web and redis.
- Web : This service is already created using the dockerfile we just created which is our flask application. The dot specifies the location of the Dockerfile to be looked for. It then publishes the port 5000 of the Flask container to the port 5000 of the host machine.
- Redis : This service uses a redis image which is pulled from the docker registry. This acts as a database to store the visit count of the webpage.
Docker Compose Commands
Here you will get step by step Docker Compose Commands
1. Build
The docker-compose.yml file is used to create images with the help of instructions provided inside it. Let’s look at the general syntax of the docker-compose build command.
$ docker-compose build [options] [--build-arg key=val...] [SERVICE...]
Let’s try to execute the build command on our application.
$ docker-compose build
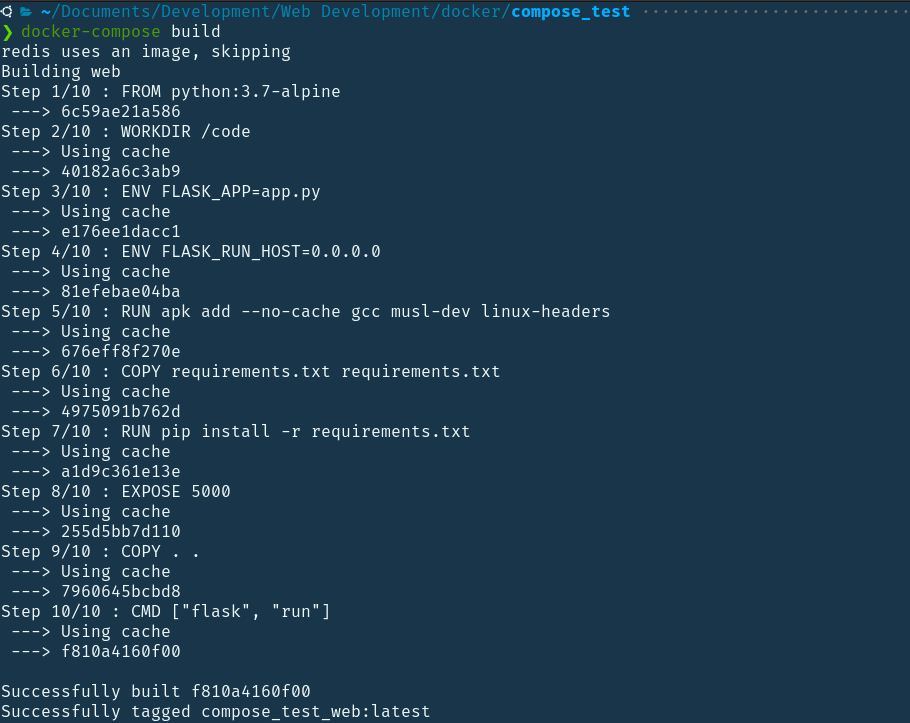
It used the dockerfile to build the web image. Here, it used the cached base image of python which already existed on the machine. As redis did not have any docker file, it just pulled it as a base image. After the services are created, it is tagged as web_service. Options
| --build-arg key=val | Set build-time variables for services with this option. |
| -m | To set the memory limit for the container. |
| --parallel | This is used to parallelly build images if there is more than one of them. |
| -q, --quiet | Nothing should be printed to STDOUT. |
2. Images
Using this command, we can list out all the images within a particular docker context. This means that this command lists out all the images built during the docker-compose build process.
$ docker-compose images
3. Run
It works in the same way as the docker run command. It'll create containers associated with those images that are mentioned in the services inside the compose file.
$ docker-compose run [options] [-v VOLUME...] [-p PORT...] [-e KEY=VAL...] [-l KEY=VALUE...] SERVICE [COMMAND] [ARGS...]
Options
| -d or --detach | Run the container in the background or the detached mode. |
| --name | To assign a name to the container. |
| -p or --publish | Used to publish a particular port of the container. |
| --no-deps | This is a useful option that prevents running the linked service. |
Let’s try to run our compose using the following command.
$ docker-compose run web
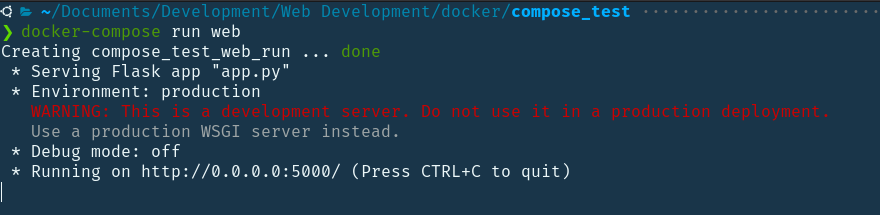
As you can see, the web service is actively running and can be accessed at port 5000 in the localhost.
4. Up
It is a merger of the docker-compose build and docker-compose run commands. If the files aren't available locally, it creates them and starts the containers. It will fork the container directly if images have already been created.
$ docker-compose up [OPTIONS] [--scale SERVICE=NUM...] [SERVICE…]
Options
| -d or --detach | Run the container in the background or the detached mode. |
| --quite-pull | While pulling the image from the registry, prevent printing the progress. |
| --build | Build the images before running the containers. |
| --force-recreate | It forces docker-compose to recreate the container even if the image and configuration have not changed. |
| --scale SERVICE=NUM | It is used to scale the number of services to spin up. This option overrides the scale setting(if any) in the compose file. |
Let’s use this command for our application.
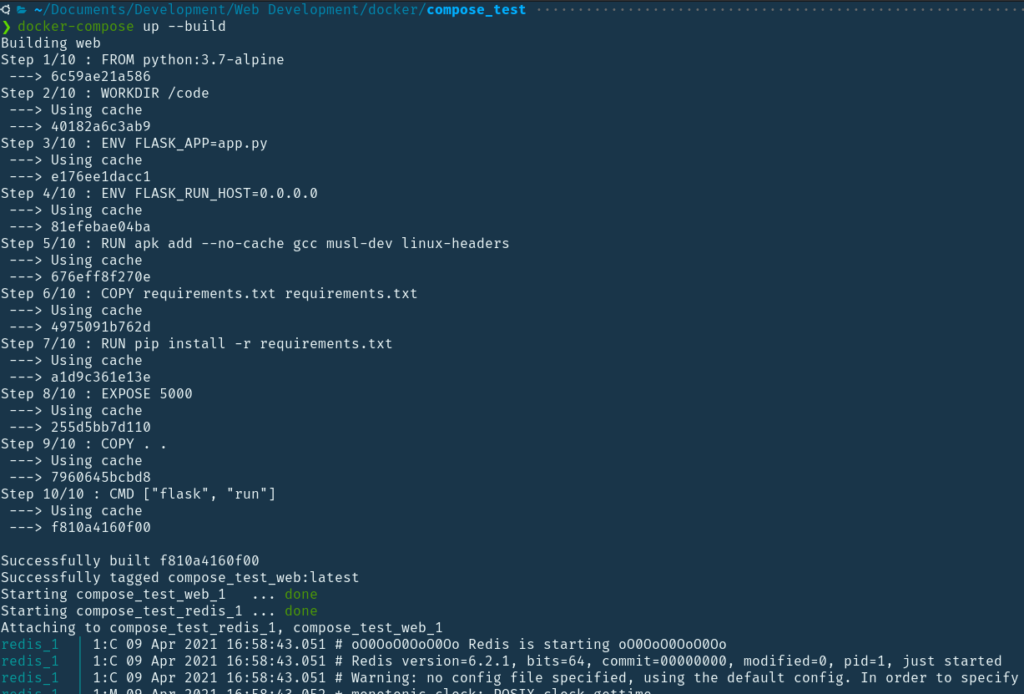
$ docker-compose up

This command created two services web and redis. The numerical value after the service name specifies how many containers or services were created. This can be manipulated using the --scale option. Before running the services, if the image is not available in the local machine, it pulls it from the registry. When we navigate to localhost:5000, we can see the application successfully running.
 When we use the --build option, it will rebuild the web service image from the dockerfile. Then, it starts the services.
$ docker-compose up --build
The detached (-d) option is used to run the services in the background mode.

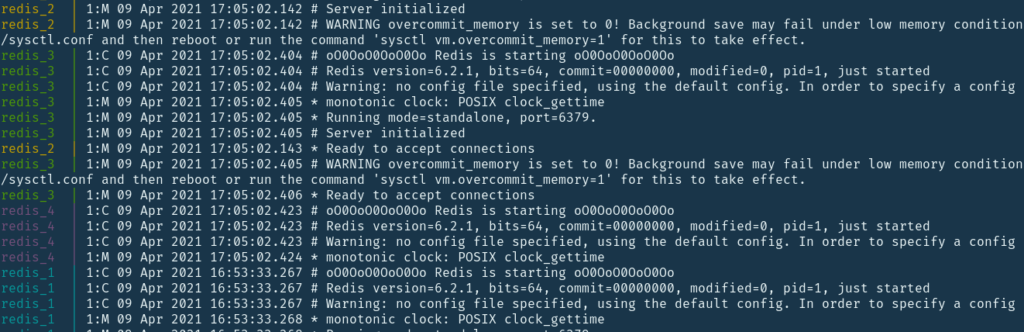
We can use the scale option to spin up as many services as we want, Here, we have used 4 redis services namely redis_1 to redis_4.
5. Ps
This command is used to list out all the containers in a particular context or from a particular compose file.
$ docker-compose ps [OPTIONS] [SERVICES]

In the previous example, we ran 4 redis services . So, you can see that all four of them have been listed here. Options
| -q or --quite | This option only displays the IDs. |
| --service | To display all the services. |
6. Pause
This command is used to save the current state, and pause all the containers. The “docker-compose unpause” can be used to unpause the containers and start them again.
$ docker-compose pause
7. Down
It is used to stop all the containers, networks, services, and images that were generated by the docker-compose up command.
$ docker-compose down [OPTIONS]
All the containers for the services specified in the Compose file, as well as the networks defined in the Compose file's networks portion, are removed. Options
| -v | Removes all identified volumes declared in the Compose file's volumes column, as well as anonymous volumes attached to containers. |
| --remove-orphans | This removes all the containers for services not defined in the docker-compose files. |
| --rmi type | Removes images of a certain type (all, local). |
The networks and volumes defined as external are never removed. Anonymous volumes are not removed by default. However, as they don’t have a stable name, they will not be automatically mounted by a subsequent up command. For data that needs to be persisted between updates, we can use the host or named volumes. Let’s use this command for our own application.
$ docker-compose down
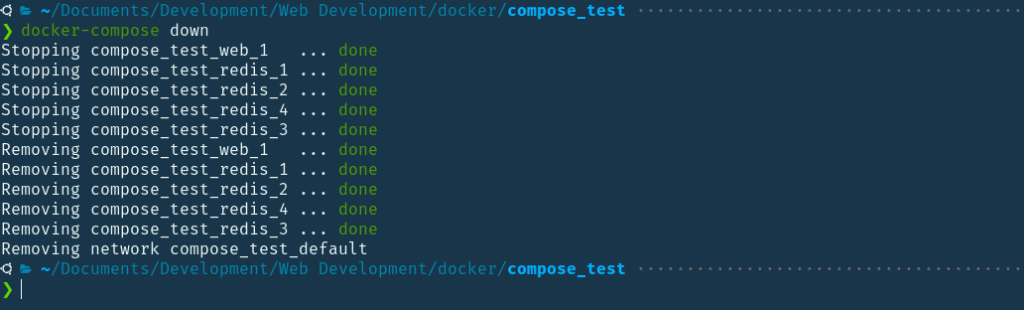
You can see that we had 5 containers running previously. Four of the redis services and 1 for the web. We can notice that the docker-compose down command first stops the services and then it removes it. It also removed the default network or the bridge between the two services.
8. Events
This command is used to stream container events for all containers.
$ docker-compose events [OPTIONS] [SERVICE..]
Options
| --json | The events in the output are steamed as JSON objects. |
Conclusion
In this article, we started with a basic introduction to Docker Compose. As it becomes extremely difficult to use traditional Docker to manage multi-container applications, we leveraged docker-compose to do so. Moving ahead, we discussed how to create a multi-service application using docker-compose file. We created a simple Flask application with a Redis database. Using this example, we explained the docker-compose file structure and all the important docker compose commands. We certainly hope that you now have an in-depth understanding of how docker-compose works and how to scale up the services using it. Happy Learning!
People are also reading:
- What is Docker Networking?
- What is Docker Swarm?
- What is Docker Compose?
- What is Docker Container Linking?
- What is Docker Logging?
- Difference between Docker Images and Container
- Docker Interview Questions
- How to Use a Dockerfile to Build Docker Images?
- How to list Docker Images?
- How to Search Docker Images using CLI?