A Docker container can be used to isolate applications from the host machine. This isolation is based on kernel namespaces and cgroups, all of which have been used for a long time in Linux. When we execute the docker run command on an image, it creates a container associated with that image. A writeable layer is stacked on top of the container’s image layers. Since the image's lower layers are read-only, this writeable layer helps you to apply changes to the containers. This tutorial will help you to be familiarise with top Docker Container Commands.
Docker Container commands
The following is a list of all the useful docker container commands and their descriptions. In the next section, we are going to discuss all these commands in greater detail with an example.
| docker container attach | It connects a running container to local standard data, output, and error streams. |
| docker container commit | It saves the current state of a container by committing the changes. |
| docker container cp | It copies files and directories from a local file system to a container and vice-versa. |
| docker container create | It is used to create a new container. |
| docker container exec | It is used to run a command inside an active container. |
| docker container inspect | It is used to display detailed information about containers. |
| docker container kill | You can use it to kill running containers. |
| docker container logs | It is used to display logs of a container. |
| docker container ls | It is used to display a list of containers. |
| docker container pause | It is used to pause processes in a container. |
| docker container port | It is used to list out the port mappings of a container. |
| docker container prune | It deletes all the stopped containers. |
| docker container restart | It restarts a running container. |
| docker container run | It is used to run a new container. |
| docker container start | It is used to start a stopped container. |
| docker container stop | It is used to stop a running container. |
| docker container rm | It is used to remove one or more containers. |
| docker container update | It can be used to update the configuration of a container. |
1. Attach Docker Container Commands
It is used to begin a new terminal session for an already running container. This is typically used for debugging, but it can also be used if specific data may need to be forwarded to programs running inside the container. The syntax for attaching a terminal to a container is:
$ docker container attach [OPTIONS] CONTAINER
The CONTAINER in the syntax stands for the container id or the container name. The options are as follows:
| --detach-keys | This option overrides the sequence of keys for detaching a container. |
| --no-stdin | It is used when you do not want to attach STDIN. |
| --sig-proxy | All received signals should be proxied to the process. |
Here, we have listed all the running containers using the docker ps command. We can see that an ubuntu container is already running. So, we used the following command to attach a new terminal session to this container.
$ docker container attach <container-id>

2. Commit Docker Container Commands
The Docker commit command is used when we want to save the changes that we made to a container. It is done by adding a new layer corresponding to the changes, on top of the existing image and creates a new image. The general syntax of the Docker commit command is -
$ docker container commit [OPTIONS] CONTAINER [REPOSITORY[:TAG]]
As usual, the CONTAINER parameter is the container id or name and the REPOSITORY parameter is the name of the new image to be created. Options:
| --author or -a | It is used to define the author of the new image. |
| --change or -c | Using this option, the Dockerfile instructions are applied while creating a new image. |
| --message | It is used to define the commit message. |
| --pause or -p | It pauses the container during the commit process. |
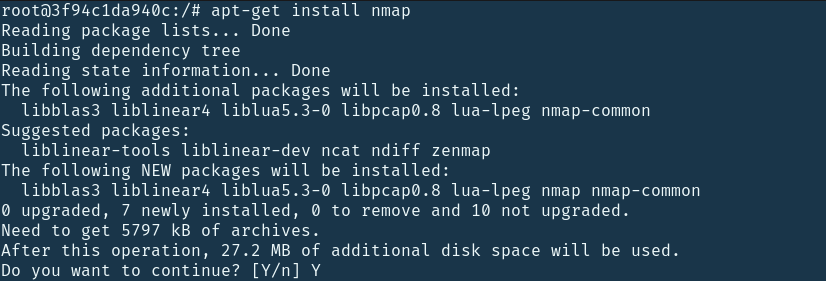
Inside the ubuntu container that we just used, let’s install nmap using the apt-get command.
$ apt-get install nmap
Now, let’s get the ID of the container using the docker ps command. And use this ID to commit the container to a new image called ubuntu_nmap.
$ docker ps
$ docker container <container-id> ubuntu_nmap

To verify the new image creation, we have used the docker images command to list all the images and piped the output with the grep command to check for the ubuntu_nmap keyword. You can see that the new image has been created.
3. Create
The container create command is similar to docker run -d command, except that it does not start the container. It simply creates a new container by creating a new writable layer on any specified image. The new container's initial status is established as created.
$ docker create [OPTIONS] IMAGE [COMMAND] [ARG...]
There are a lot of options you can specify, like the processing power it needs to use or the IPv4, IPv6 addresses, etc. You can look at all the options
here
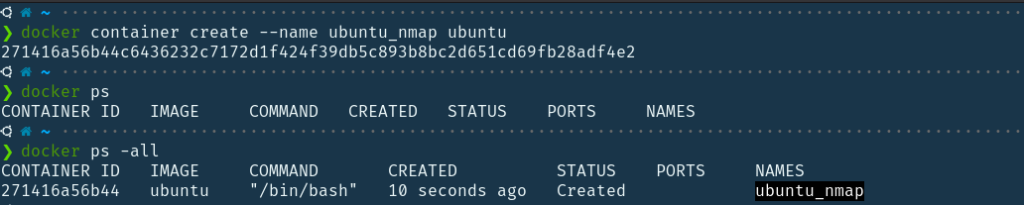
. Let’s try to create a new container called ubuntu_nmap associated with the ubuntu image. We have used the --name option to give a name to the container. $ docker container create --name ubuntu_nmap ubuntu Next, let’s use the Docker ps command to list all the active containers. You will find that there is no active container called ubuntu_nmap running. If we list all the containers in the machine using the
docker ps -all
command, you will find the new container has been listed with the status called created.
4. Exec
The container exec command is used when we want to execute certain commands inside a running container. Syntax:
$ docker container exec [OPTIONS] CONTAINER COMMAND [ARG...]
There are a few options that you can use along with this command.
| --detach or -d | It is used to run the command in the detached or background mode. |
| --env or -e | This option is used to set environment variables. |
| --workdir or -w | It is used to set the working directory inside the container. |
If we want to execute a list ( ls ) command to check the files and directories inside the root directory, you can use this command.
$ docker container exec CONTAINER_ID/NAME ls
Here, we have used the docker container run command to run a container associated with the Ubuntu image in interactive and background mode. So, when we execute a
docker ps
command, you will find that the container is actively running. Then, we have used the docker exec command on the same container along with the
ls
sub-command. Please note that the container on which you are running the container exec command should be actively running otherwise it will throw an error.
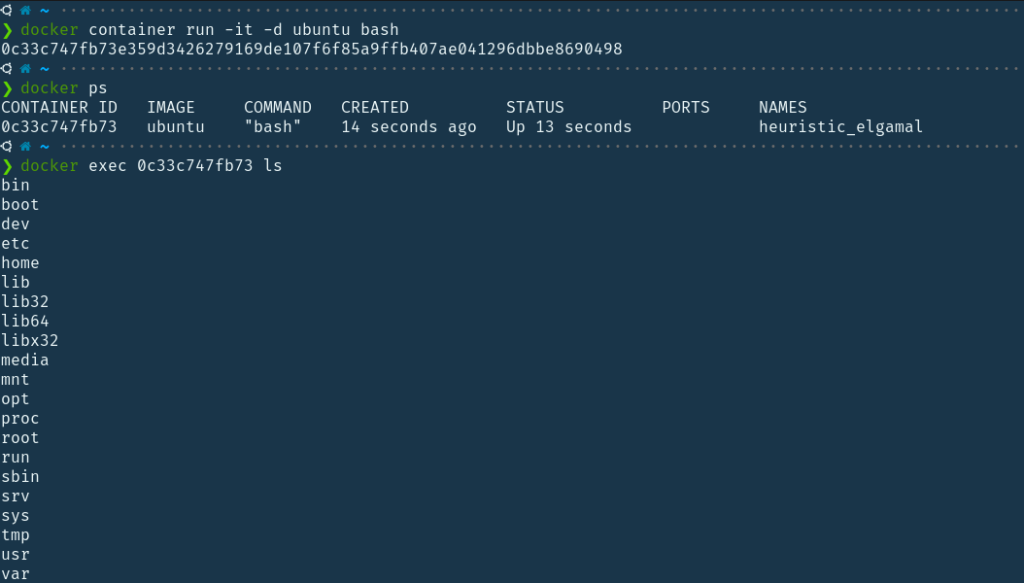
You can see that the entire list of files and directories has been printed. In another example, let’s use this exec command to echo a simple message.

As we can see, the output that has been displayed is on the STDOUT of the container.
5. Inspect
The container inspect command is used to list out details and information about the container. These include the status of the container, its creation date, IP address , etc. The general syntax of the command is -
$ docker container inspect [OPTIONS] CONTAINER [CONTAINER...]
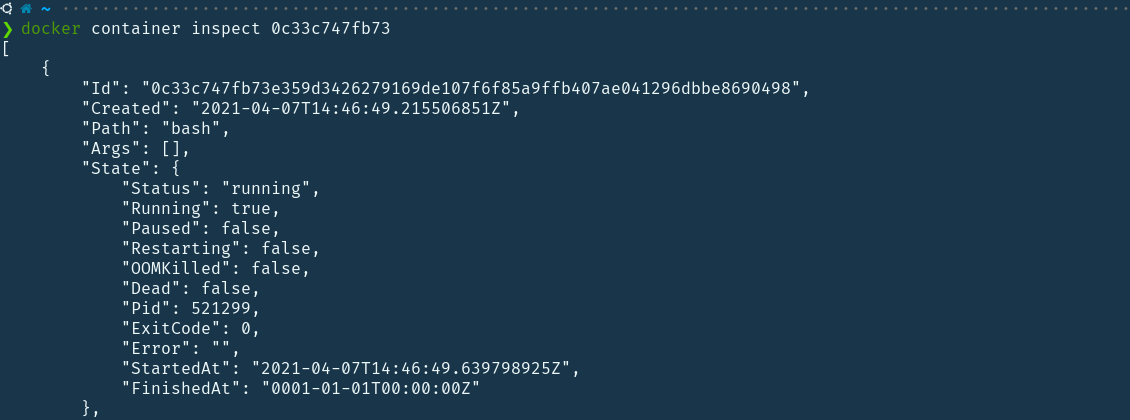
Let’s try to inspect a container.
$ docker container inspect <container-id>
Let’s say we want to display only the IP address. We can use the format option to do so which uses a Go template.
$ docker inspect --format='{{ .NetworkSettings.IPAddress }}' CONTAINER_ID

6. Kill
The container kill command is used to kill one or more containers. This command basically sends a SIGKILL signal (as in Linux) to the container, particularly to the main process of the container. You can also give a custom signal using the --signal option. Let’s use the docker ps command to list all the active Docker containers. Let’s kill the container called heuristic_elgamal using the following command.
$ docker container kill heuristic_elgamal
If we list all the active containers now, you will find that no containers are now running.
$ docker ps
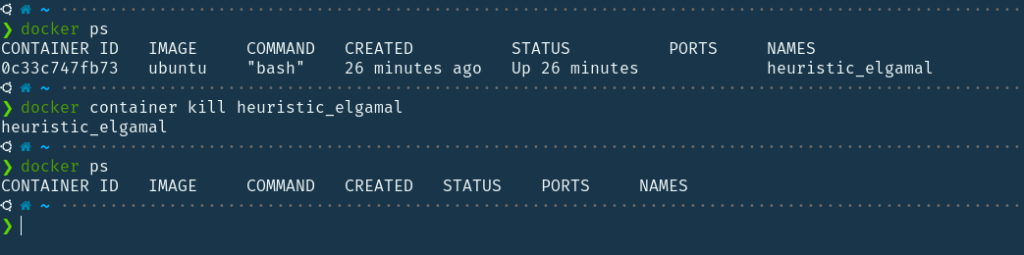
Here, we did not specify any custom signal. So, it sent a SIGKILL by default and killed or stopped the container. Let’s use the SIGHUP signal to kill the container this time.
$ docker container kill --signal=SIGHUP keen_euler

These are some standard Linux signals that you can use. You can get to know about them through this page linux_signal for more info.
7. Logs
The docker logs command retrieves all of a container's logs in batches. The syntax of this command is -
$ docker container logs [options] CONTAINER
Options : These options will be very helpful while debugging the application in development or production.
| --follow or -f | This option is used when we need a continuous stream of output from the container. |
| --tail or -n | It takes an integer as an input, which specifies the number of lines at the end to display in the log. |
| --timestamp | This command appends an RFC3339Nano timestamp to each log entry, such as 2014-09-16T06:17:46.000000000Z. |
| --since | Only container logs created after a certain date are displayed using this option. |
Let’s use these options for an Nginx server deployed in a container.
$ docker container logs <container-id>
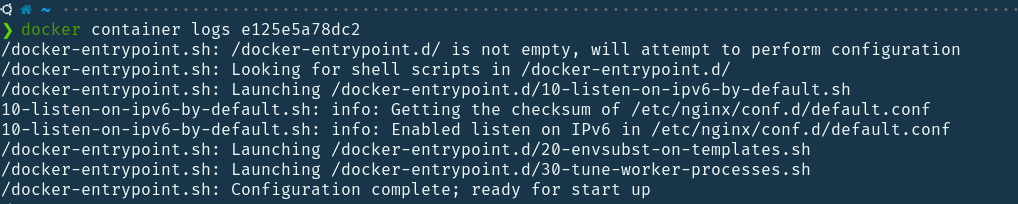
You can see the entire logs have been displayed.
8. Pause
The container pause command halts all the processes in the containers listed. The SIGSTOP signal is used to suspend a process. Let’s first list all the running containers.
$ docker ps
Now, let’s use the container pause command to pause this command.
$ docker container pause loving_dijkstra

9. Port
The container port command is used to display a list of port mappings for the container. Below is the syntax for the command.
$ docker container port CONTAINER [PRIVATE_PORT[/PROTO]]
Let’s run an Nginx container and publish port 3000 of the container to port 80 of the local machine.
$ docker container run -it -d -p 3000:80 nginx:latest
Let’s try to use the below commands to understand the docker container port command.
$ docker container port dreamy_booth
$ docker container port dreamy_booth
$ docker container port dreamy_booth 80
$ docker container port dreamy_booth 80/udp
$ docker container port dreamy_booth 80/tcp
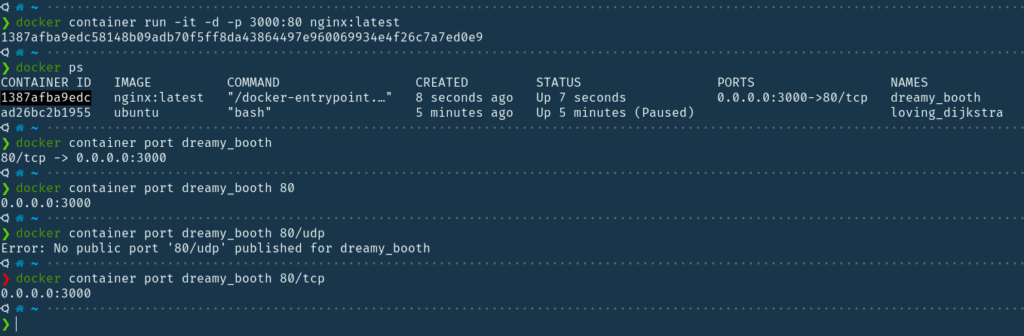
You can search for particular ports or protocols by passing those as arguments.
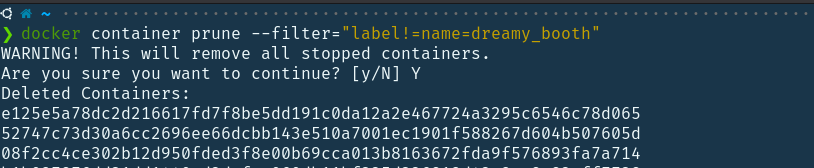
Prune
The Docker container prune command is used to remove all the stopped or unused containers.
$ docker container prune [options]
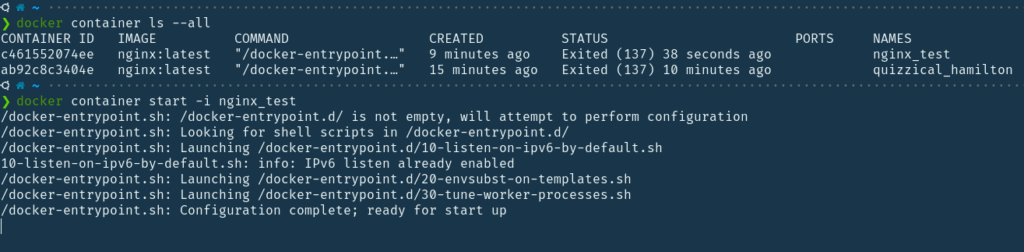
This command removes all the containers by default if you don’t specify any options. Let’s list all the containers first.
$ docker container ls --all
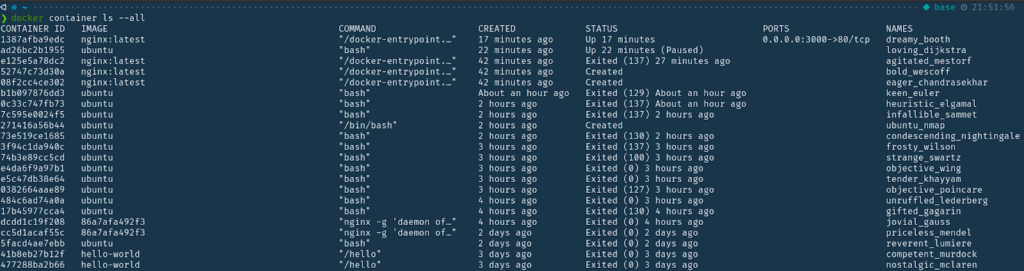
In the above image, you can see that there are lots of unused or stopped containers. Let’s use the filter option to remove all the stopped dreamy_booth containers.
$ docker container prune --filter=”label!=name=dreamy_booth”
10. Run
The Docker run command is one of the most frequently used commands. This is unsurprising given that its primary purpose is to create and run containers. A container can be run in a variety of ways. You can customize a container to run in detached mode, set a container name, mount a volume, and perform several other tasks by adding options to the standard syntax. $ docker container run [OPTIONS] IMAGE [COMMAND] [ARG...] Let’s create an Nginx container with options such as -it for running the container interactively, -d to run the container in detached mode, and -p to publish ports.
$ docker container run -it -d -p 3000:80 nginx:latest
Let’s list all the active containers to verify.
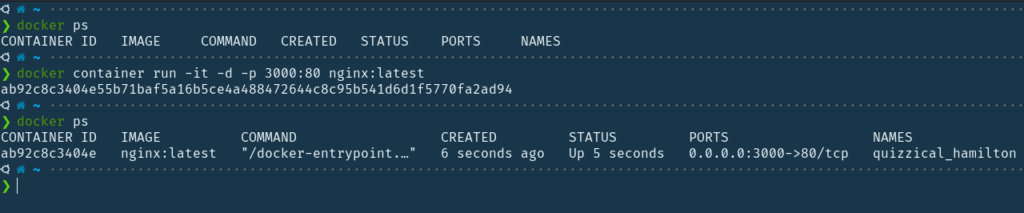
Options:
| --interactive or -i | It is used to run a container in interactive mode, which means that STDIN will be open even if it is not attached. |
| --detach or -d | For detached mode or running the container in the background. |
| --publish or p | Publish the ports inside the container to the outside port of the local machine. |
| --name or -n | Name the container. |
We can provide a name to the container using the --name option.
$ docker container run --name=NAME [OPTIONS] IMAGE

Here, we have given a name called nginx_test to the same Nginx image.
11. Start
The container start command is used to start a stopped container or an unused container
$ docker container start [OPTIONS] CONTAINER [CONTAINER...]
Options:
| --attach or -a | For attaching forward signal and STDOUT. |
| --interactive or -i | Starting the container in an interactive session. |
Let’s list all the containers using the following command.
$ docker container ls --all
Now, let’s use the container start command to start the nginx_test image that is currently inactive in interactive mode.
$ docker container start -i nginx_test
12. Stop
The container stop command is used to stop one or more running containers.
$ docker container stop [OPTIONS] CONTAINER [CONTAINER...]
The stop command sends the instruction to the container after 10 seconds by default which is the grace period. If you specify the option --time or -t, you can increase or decrease the grace period. Let’s stop the nginx_test image after a grace period of 5 seconds that we have mentioned using the --time option.
$ docker container stop --time=5 nginx_test

Conclusion
To sum up, in this article, we deep-dived into some of the most important Docker container commands which are necessary to build Docker images and deploy applications seamlessly. We discussed almost all of the important commands along with some options or variations with examples for your better understanding. There are other options or tweaks you can perform with each command for desired outcomes. So, do go through them as well from the official docker documentation docs.docker.com . We certainly hope that you will now be able to get hands-on with Docker containers and their commands. Keep learning!
People are also reading: