Docker is a free and open-source platform that can be used for building, delivering, and running applications in an isolated environment. Docker allows you to decouple your code from your hardware, allowing you to easily deploy and share apps. One of the highlighting features of docker is that we can run multiple docker environments in the same host environment. This tutorial will give you a brief about Docker Swarm, What is it, and How it works? However, based on how much load the host machine can take, Docker may only be able to deploy a certain number of containers, because all the containers run on a single host. But what if your application starts gaining traction and you now want to scale your application to multiple containers. This is where the Docker swarm comes into the picture. Docker swarm creates a network of a large number of nodes (running Docker engines) running in a cluster. These nodes can communicate with each other, helping developers to maintain multiple nodes in a single environment.
What is Docker swarm?
A Docker Swarm Mode consists of multiple Docker hosts that serve as managers (to handle membership and delegation) and workers (that run swarm services). A Docker host may be a manager, a worker, or both at the same time. You can determine the optimum state of service when you develop it. This includes the number of replicas, network, and storage resources available to a node, ports that the service/nodes can expose to the outside world, and many more. Docker schedules a worker node's activities to other nodes if that node becomes inaccessible. A job, as opposed to a standalone container, is a running container that is part of a swarm service and operated by a swarm manager. When you're in swarm mode, you can change the configuration of a service, including the networks and volumes it's connected to, without having to restart it manually. Docker will upgrade the configuration, avoid any service tasks that have out-of-date configurations, and start new ones that fit the desired configuration. So, the difference between swarm mode and standalone docker containers is that in swarm mode only managers can manage the cluster of networks, unlike standalone containers which can be started on any daemon. But, the daemon can participate in swarm mode as a manager or worker, or both.
Swarm Architecture
Previously, we have used terms such as manager, worker, nodes, etc. Now, let us try to understand what the mean and how the docker swarm actually works.
Node
A node is a Docker engine instance that is part of the swarm network. This can also be thought of as a Docker server. One or more nodes may operate on a single physical host or cloud server. But in development, these swarm cluster nodes can be spread over several machines on the cloud. There are two types of nodes - manager and worker nodes.
1. Manager
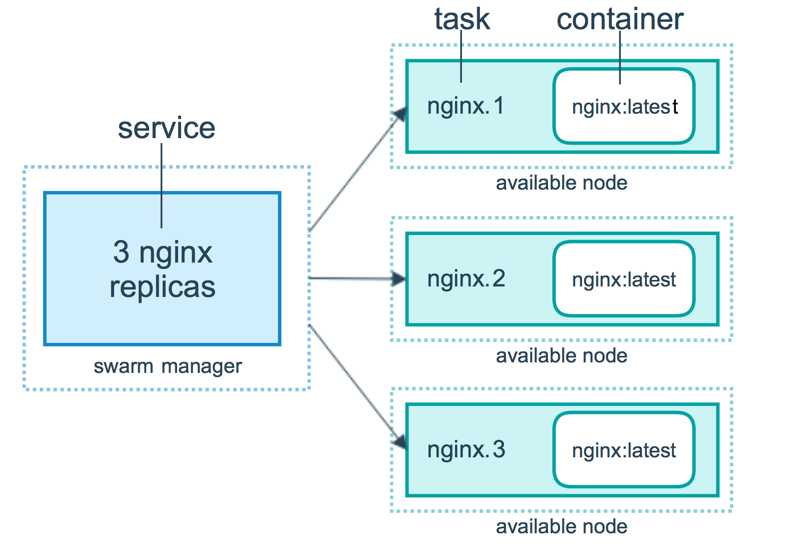
In the above image, we can see a swarm manager who is responsible to manage what a docker worker does. It maintains track of all of its workers' whereabouts. Docker Manager knows what job the worker is working on, what task it has been allocated, how assignments are distributed to all jobs, and whether the worker is up and running or not. Docker Manager's API is used to build a new service and orchestrate it. It assigns tasks to workers using the worker’s IP addresses.
2. Worker
The Docker Manager has complete power over a Docker Worker. The Docker Worker accepts and executes the tasks/instructions that the Docker Manager has delegated to it. A Docker Worker is a client agent that informs the manager about the state of the node it’s been running on through a REST API over HTTP protocol.
Services
The tasks to be executed by the manager or worker nodes are described as a service. It is the swarm system's core mechanism and the intersection point of user engagement with the swarm mode. When we create a service, we also create containers and specify tasks, which must be executed inside them. The swarm manager distributes a certain number of replica tasks among the nodes in the replicated resources model depending on the scale you set in the desired state.
Load balancing
To make the resources available externally to the swarm, the swarm manager uses ingress load balancing. The swarm manager can add a PublishedPort to the service automatically, or you can manually configure one. If you don't mention a port, the swarm manager assigns a port between 30000 and 32767 to the operation. External modules, such as cloud load balancers, can access the service through the PublishedPort of any node in the cluster, regardless of whether that node is actually performing the service's task. Ingress links are routed to a running task instance by all nodes in the swarm.
Features
Let us see what are the highlighting features of the Docker Swarm mode.
- We can use the Docker Engine CLI to create a swarm of Docker Engines where we can deploy application services. We don’t need additional orchestration software to create or manage a swarm.
- The Docker Engine can be used to deploy both manager and worker nodes. This means that a swarm can be created simply wherever Docker Engines can run.
- Docker Engine takes a declarative approach when defining the optimal state of our application stack.
- We need to declare the number of tasks to be performed with each service. When the swarm manager scales up or down (this means that we are scaling up or down the number of services or containers), it automatically adapts to preserve the desired state, by adding or deleting tasks.
- The swarm manager node checks the cluster status continuously and reconciles any inconsistencies between the current state and the target state. For instance, you set up a service of running 10 container replicas on 5 workers, and two of the replicas on one of the worker crashes. Then, the manager creates two more replicas and assigns them to the worker that is up and running.
- A network overlay for your services will be specified. When the application is initialized or modified, the swarm manager immediately assigns addresses to the containers in the overlay network. The ports may be shown to an external load balancer. Internally, we need to decide how service containers can be distributed between nodes.
Getting hands-on with Docker Swarm
Having understood the basics of Docker Swarm, let’s get hands-on with Swarm mode with a practical example. We will create a cluster, add two worker nodes, and then deploy services to that swarm.
Pre-requisites
- Three Linux machines or instances, that can communicate over a network.
- Docker installed on all three of them.
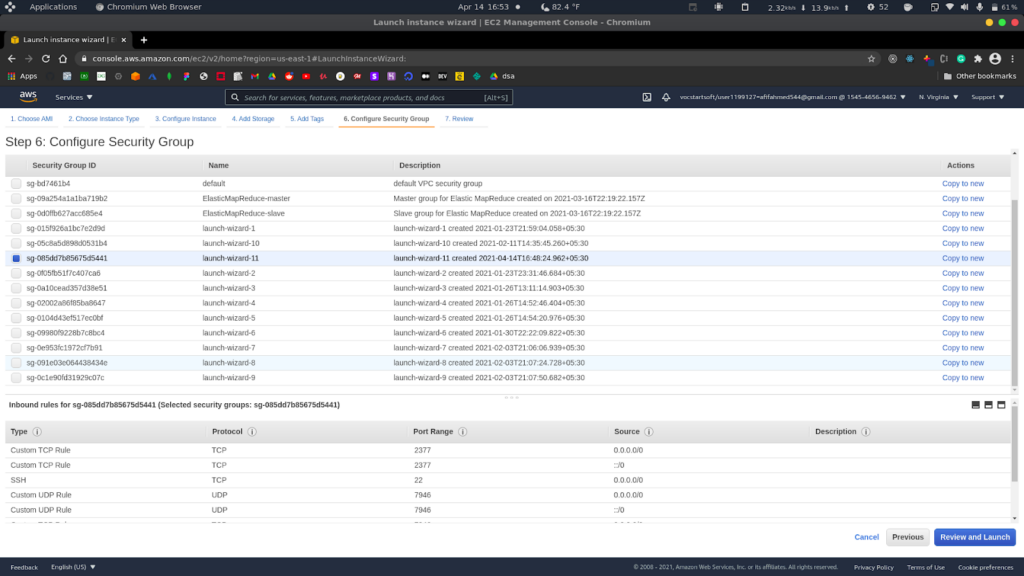
In this tutorial, we have included three Linux hosts with Docker installed on all 3 of them and all of them are compatible with network communications. They can be physical, virtual, or even Amazon EC2 instances. One of the nodes will be a manager and the other two will be workers. We will be using three Linux machines hosted on AWS, which are EC2 instances. While creating EC2 instances, we have added the following rules in the security group. The following ports must be available. On some systems, these ports are open by default.
- TCP port 2377 for cluster management communications.
- TCP and UDP port 7946 for communication among nodes.
- UDP port 4789 for overlay network traffic.
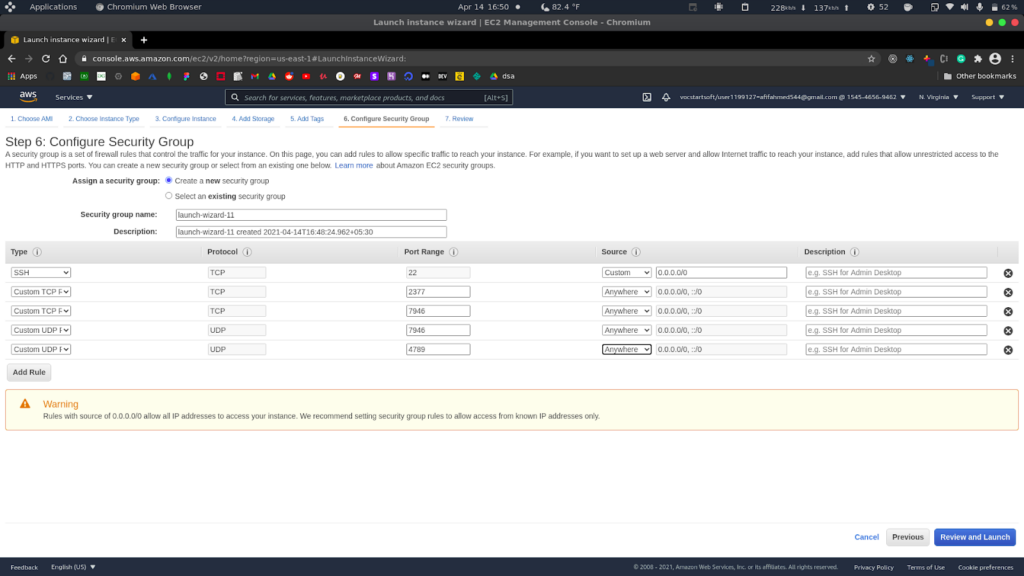
While creating the manager machine, we add these rules. Next, when creating the worker nodes, we use the same security group created for the manager machine.
Next, we will ssh into all the machines and install docker-engine. We have used the following commands to install docker-engine on all three machines.
- To update and add packages of the apt installation index, so that apt can use an HTTPS repository.
$ sudo apt-get update
$ sudo apt-get install \
    apt-transport-https \
    ca-certificates \
    curl \
    gnupg \
    lsb-release
- Next, we have added Docker’s official GPG key:
$ curl -fsSL https://download.docker.com/linux/ubuntu/gpg | sudo gpg --dearmor -o /usr/share/keyrings/docker-archive-keyring.gpg
- Next, we have used the following commands to set up the stable repository.
$echo \ "deb [arch=amd64 signed-by=/usr/share/keyrings/docker-archive-keyring.gpg] https://download.docker.com/linux/ubuntu \ $(lsb_release -cs) stable" | sudo tee /etc/apt/sources.list.d/docker.list > /dev/null
- Finally, we have installed Docker engine.
$ sudo apt-get update
$ sudo apt-get install docker-ce docker-ce-cli containerd.io
We have repeated the same process for all three machines. We will now be able to create a swarm mode after we have completed all the setup steps. We need to ensure that the host machines are running the Docker Engine daemon. We open a terminal and ssh on the node where the manager node must be executed.
In the manager node, we can run the following commands to create a new swarm.

$ docker swarm init --advertise-addr <MANAGER-IP>
We have a manager machine with IP 172.31.80.181, so our command will be -
$ docker swarm init --advertise-addr 172.31.80.181

The --advertise-addr flag configures the manager node as 172.31.80.181 to publish its address. The other swarm nodes must have access to the IP address of the manager. The output displays commands that can be used to attach new nodes to the swarm. Nodes will enter as managers or workers according to the flag value. To see the current state, we can use the docker info command -
$ sudo docker info
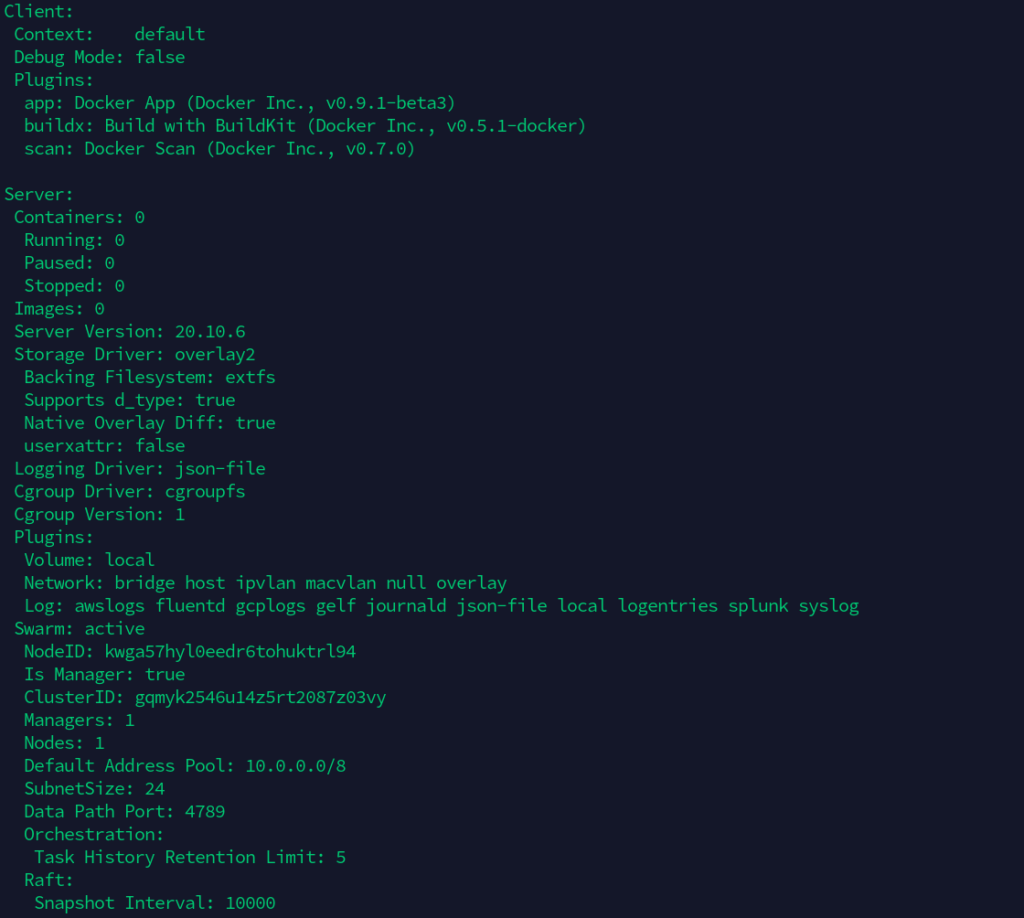
In the above output, we can see that there are no containers running on the docker server and the swarm flag is active. This also prints out the clusterId and number of managers and nodes, etc. To view information about nodes, we can use the following command.
$ docker node ls

The * next to the ID represents that this is the node we are currently connected to. The swarm mode names the machine with a hostname automatically.
Adding Worker Nodes
Now, it's time to add worker nodes to the above-created swarm cluster. For that, we need to ssh into the machine which we want to run as worker nodes. We must run the output of docker swarm init we got earlier in this worker terminal:
$ docker swarm join --token SWMTKN-1-05ikz9ituzi3uhn1dq1r68bywhfzczg260b9zkhigj9bubomwb-a003dujcz7zu93rlb48wd0o87 172.31.80.181:2377

We can execute the following command on a manager node to retrieve a worker's join command if you are not able to get hold of the actual command -
$ docker swarm join-token worker

Next, we do the same with the other work as well. We will SSH into the third machine and run the join command there as well. After that, to view the worker nodes, we will open a terminal in the host machine and ssh in the machine that runs the manager node and execute the Docker node ls command there.
$ docker node ls

The manager nodes in the swarm are determined by the column MANAGER STATUS. Worker1 and worker2 are identified as working nodes by the empty state in this column.
Deploying a service to the Docker Swarm
Now we have a cluster with a manager and two workers. We can now deploy services to this swarm cluster. We need to open a terminal and SSH into the manager node, and run the following command.
$ docker service create --replicas 1 --name helloworld alpine ping docker.com
Let's break down the above command:
- docker service create - It is used to create a service.
- --replicas - This flag indicates the desired state of 1 running instance.
- --name : It is used to name the service.
- alpine ping docker.com : It indicates that the services is going to run alpine Linux and the primary command to run inside the instance or service is ping docker.com .

To see the list of running services, we can execute the below command:
$ docker service ls

This above output lists the name of the service we just created and the number of replicas, along with the base image, which is alpine. To inspect a service, we can use the below command -
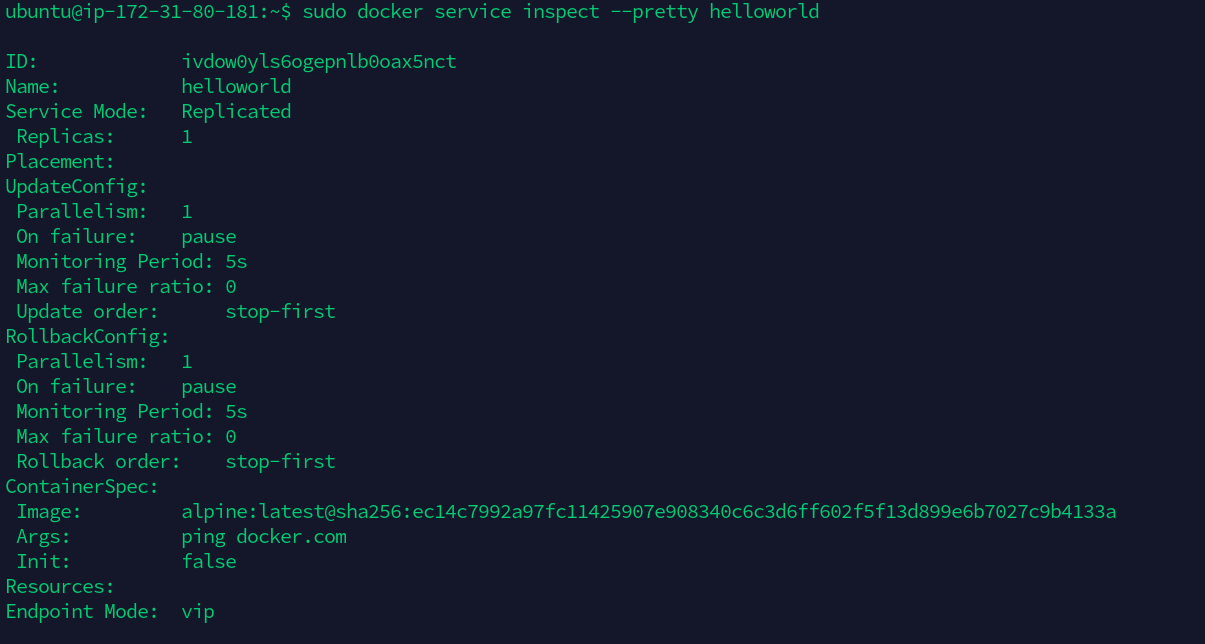
$ docker service inspect --pretty helloworld
Wrapping Up!
In the above article, we started with a basic introduction to Docker and Docker Swarm. We discussed the need for multiple docker containers for a single application. We then discussed what is docker swarm, its uses, and how it works with the help of Docker Swarm architecture. We also covered different docker swarm terminologies like manager nodes and worker nodes, services, load balancing, etc. Post that, we got our hands dirty on Docker Swarm by practically creating a Docker Swarm cluster. We started with creating 3 Linux hosts in AWS as EC2 instances along with their security group configuration(by adding TCP and UDP rules ). We looked at how to create or initialize a swarm cluster through a manager node and added a couple of worker nodes to the same cluster. Finally, we added a service running Linux alpine to execute the ping command. We certainly hope that this article would help you get started with Docker Swarm and create clusters and deploy services quite easily.
Happy Learning.
People are also reading:
- What is Docker Networking?
- What is Docker Swarm?
- What is Docker Compose?
- What is Docker Container Linking?
- What is Docker Logging?
- Difference between Docker Images and Container
- Docker Interview Questions
- How to Use a Dockerfile to Build Docker Images?
- How to list Docker Images?
- How to Search Docker Images using CLI?