A Docker image is a multi-layered file used to define the environment in a Docker container. An image is a series of instructions for creating a fully functional and isolated environment for running applications that runs on the kernel of the host operating system. One or more instances of an image are created when a Docker user runs an image. This blog post will give you a complete brief about Dockerfile Instructions. To know more about Docker images and containers, you can refer to the following blog posts:
When we execute the docker run command on an image, it creates a container associated with that image. In such a case, a writable layer is created on top of the read-only image layers. Since the lower layers of the image are read-only, you can use this writeable layer to make changes to the container and then commit these changes to create a new image.
What is Dockerfile?
A Dockerfile is a special file that helps you to outline how an image would be built in Docker. Each line in a Docker file is an instruction that instructs the daemon how to build an image. Its functionality is similar to a bash script. It contains the instructions that can be used to build an image using the Docker CLI. One of the most important aspects of Docker containers is that they are meant to be reused. You can destroy it, recreate it, and reuse it any number of times. A container is the top layer after all the layers of the image are built. Each layer is read-only of the stack except the container layer at the top. Let’s build a basic image like a nodejs server.

FROM node:10
WORKDIR /usr/src/app
COPY package.json ./
RUN npm install
COPY . .
EXPOSE 8080
CMD ["node","server.js"]
Here, the image is being pulled from the node:10 repository. So, node:10 is the base image with the node preinstalled. WORKDIR allows us to set a default working directory. Now, all we have to do is to use COPY instruction to copy the files to the same directory. The process of building applications from a repository helps us to save space and time by reusing existing layers. RUN, COPY and ADD are examples of instructions that will create intermediate layers and others will not influence the size of your image. The process of creating a container image using the information and context given by its Dockerfile can be done by using the Docker build command. The Docker command below can be used to construct images.
$ docker build [OPTIONS] PATH | URL | -
To locate a Dockerfile in your system, we can use the -f flag with docker build :
$ docker build -f /path/to/a/Dockerfile .
We can describe a repository and tag it to save a new image after a successful build:
$ docker build -t tag_name .
To add more tags, you can just add a -t followed by the tag name or repository name.
$ docker build -t tag_name_1 -t tag_name_2 .
Important Dockerfile Instructions
Here we have highlighted all the important Dockerfile Instructions.
| FROM | This instruction tells the docker, which image is to be used as the base image or the parent image. |
| LABEL | This adds metadata such as the maintainer of this docker container, etc. |
| ENV | It sets an environment variable. |
| RUN | It creates an image layer and executes commands inside the container. Packages are installed into containers using this method. |
| COPY | It is responsible for copying files or directories from the local machine to the container. |
| ADD | ADD and COPY are pretty much similar, ADD is useful when we have to untar a file or download any file. |
| CMD | It is used to define a primary command and argument that are run by a container after its creation. There must be just one CMD instruction in a Dockerfile. |
| WORKDIR | This specifies which directory the following instructions must be executed in. |
| ARG | It defines a variable and passes it to docker, which can be used by docker daemon at build time. |
| ENTRYPOINT | It is used to specify commands and arguments while a container is running. |
| EXPOSE | It exposes a port from the container to the host machine. |
| VOLUME | It creates a directory mount point to access and store persistent data. |
Dockerfile Instructions with Examples
Now we should know all dockerfile instructions with examples one by one in details:
1. FROM
Since the instructions are executed from top to bottom when constructing an image, a valid Dockerfile should start with ARG or FROM. This instruction is used to pull a base image from the Docker registry.
FROM [--platform=<platform>] <image> [AS <name>]
ARG is the only instruction that can be included before the FROM instructions. The FROM instruction starts the build process by setting the base image, also known as the parent image, for subsequent instruction executions.
For example:
FROM ubuntu:20.04
Include this in your Dockerfile and run the build command in the directory in which the Dockerfile is present.
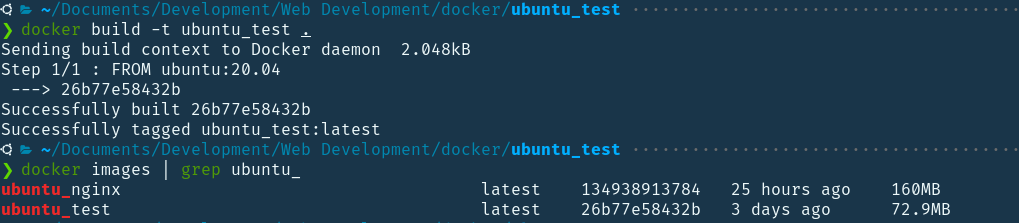
$ docker build .
We get,
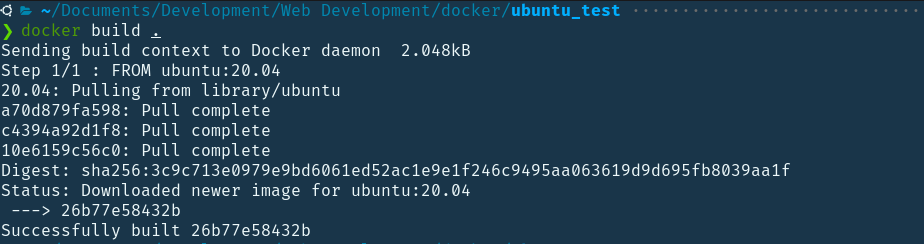
The image repository is ubuntu, and the tag 20.04 instructs the docker which version of ubuntu to pull. If no tag is specified, the most current version is downloaded by default. As you can see in the above build process, there is only one instruction that is “FROM ubuntu”. It pulls it from the docker remote repository if it is not present locally. If present locally, it uses it and stacks the other layers of instruction on top of it.
2. LABEL
The LABEL instruction gives image metadata in the form of a key-value pair stored as a string. If a key-value pair has several similar keys, the most recent pair will be overwritten, and all other pairs will be discarded. You can also provide details about the maintainer.
LABEL <key>=<value> <key>=<value> <key>=<value> …
LABEL can be applied to:
- Images
- Containers
- Local daemons
- Volumes
- Networks
- Swarm nodes
- Swarm services
This helps in the systematic organization and maintenance of the data. Example: LABEL "www.example.com"="UBUNTU LINUX" LABEL “www.example.label="function" There can be several labels for a single image. In a single line, you can define several labels. Your image inherits labels from its base or parent images (images in the FROM line). If a label with a different value still exists, the most recently added value takes precedence over any previously set value.
3. ENV
The ENV instruction changes the value of the environment variable <key> to <value>. This attribute would be in the setting for all subsequent build stage instructions. It will omit quoted characters if they are not escaped. Quotes and backslashes, like command-line parsing, can be used to contain spaces inside values. ENV <key>=<value> ... Example :
ENV NAME="asdf"
ENV FOOD=BURGER\ NOODLES\ BAGLES The ENV instruction allows us to set multiple <key>=<value> ... variables one at a time. The above given example is the same as writing:
ENV NAME="asdf" FOOD=QWERTY\ PASTA\ CHIPS
4. RUN
The RUN instruction has 2 forms:
- RUN <command> ( shell form)
- RUN ["executable", "param1", "param2"] ( exec form)
Any command mentioned with a new RUN instruction will be executed in a new layer on top of the current image, and the changes will be committed. The resulting image which is committed will be used by Dockerfile for the next instruction. Layering RUN instructions and creating commits allows us to create runtime environments quickly and efficiently due to caching mechanisms. The SHELL command can be used to modify the default shell for the shell type. During the next build, cache from the previous build will be reused. The --no-cache flag can be used to invalidate the RUN instruction cache.
5. COPY
The COPY instruction is used to copy the build context and has couple of forms:
COPY [--chown=<user>:<group>] <src>... <dest>
COPY [--chown=<user>:<group>] ["<src>",... "<dest>"]
This instruction copies files or directories from a local machine that is the <src> directory and adds them to the filesystem of the container directory at path specified by <dest>.
6. ADD
The COPY and ADD commands are somewhat similar, with a few key variations. ADD will accept URLs to import files from the internet in addition to local files, and it will immediately unzip any tar files it downloads or adds. COPY can only copy files from your local machine. If you need to unzip something or import something, use ADD. The ADD instruction also has two types of syntax:
ADD [--chown=<user>:<group>] <src>... <dest>
ADD [--chown=<user>:<group>] ["<src>",... "<dest>"]
7. CMD
The CMD instruction specifies the primary command that an image will run when a container is created and not during the build process. The CMD instruction has three forms:
- CMD ["executable","parameter_1","parameter_2"]
- CMD ["parameter_1","parameter_2"]
- CMD command parameter_1 parameter_2
Only one CMD instruction is allowed in a Dockerfile. If more than one CMD commands are present, then the latest command is used for execution, ignoring other CMD commands. Also, if we provide a sub-command to docker with the docker run command to create a container, then this will override the CMD instruction in the Dockerfile.
8. WORKDIR
The WORKDIR instruction changes the current working directory for all the subsequent instructions until a new WORKDIR instruction is encountered. We can use multiple WORKDIR instructions in a single Dockerfile. Each WORKDIR instruction switches the current working directory if relative paths are given. An example is -
WORKDIR /path/to/workdir
ENV DIRPATH=/path
WORKDIR $DIRPATH/$DIRNAME
RUN pwd
9. ARG
The ARG instruction is used to define a variable that can be pass from the command line to the image during the build-time. A Dockerfile contains at least one ARG instruction.
ARG <name>[=<default value>]
Docker has some predefined ARGS which includes -
- HTTP_PROXY or http_proxy
- HTTPS_PROXY or https_proxy
- FTP_PROXY or ftp_proxy
- NO_PROXY or no_proxy
A simple example is -
FROM ubuntu:20.04
ARG NO_PROXY
RUN echo "Hi"
An ARG or an ENV instruction can be used to define variables that are available to the RUN instruction. If the ENV and ARG variables have the same name, then ENV instruction overrides the latter. ARG variables, unlike ENV variables, are not accessible inside the containers. When building the image, we can use ARG values to set a default value for an ENV variable from the command line. The ENV variable then remains during the container's runtime.
10. ENTRYPOINT
An ENTRYPOINT instruction is used to define a set of commands that gets executed when we run a container. Unlike CMD, if we specify a sub-command directly through the Docker run command, the ENTRYPOINT commands do not get overridden. ENTRYPOINT has two forms: The exec form, which is the preferred form:
ENTRYPOINT ["executable", "parameter_1", "parameter_2"]
The shell form:
ENTRYPOINT command parameter_1 parameter_2
There must be at least one ENTRYPOINT or CMD instruction in the dockerfile. Generally, the exec form is recommended for this instruction since the data is usually stored in JSON format.
11. VOLUME
Before discussing the VOLUME instruction, let’s understand the Bind Mount . Bind mounts allow us to access files on our host machine inside the container. This gives us a lot of control over our containers’ file system. We don't have to decide what files the container should have when we create it, and we can simply access the files directly from the mounted directories. Bind mounts, as we've seen, are useful when we need to exchange data between our host and container. Volumes, on the other hand, are used to keep the containers in sync between runs. They help in data storage and persistence. Volumes can be shared among multiple containers. VOLUME ["/data"] This instruction creates a mount point where the containers store and/or access data from. The value can be mentioned as a JSON array, a directory such as VOLUME ["/var/log/"], or a plain string with multiple arguments, such as “VOLUME /var/log” or “VOLUME /var/log /var/db”. For example:
FROM ubuntu
RUN mkdir /newvolume
RUN echo "hello world" > /newvolume/world
VOLUME /newvolume
This Dockerfile creates an image that tells Docker to create a new mount point at /newvolume and copy the world file into it.
12. EXPOSE
The EXPOSE instruction is used to expose ports from inside the container to the host machine. However, if we don't use the publish option, the ports aren’t revealed. So this instruction is just a documentation mechanism informing the users, which ports of the container are available to be exposed. EXPOSE <port> [<port>/<protocol>...] We can use -P instead of -p <containerport>:<hostport> so that all of the ports we exposed using the EXPOSE instruction will be randomly mapped to the ports on the host machine. When we use docker ps command to list all the active containers, we will see which ports are mapped. It'll display something like 0.0.0.0:32769->3000/tcp, which means it chose 32769 of the container and mapped it with port 3000 in the host with TCP protocol. By default, if we don’t specify any protocol, it used the TCP protocol. The Below instructions are used for exposing ports using both TCP and UDP. EXPOSE 80/tcp EXPOSE 80/udp
Wrapping Up!
In this article, we discussed some of the most frequently used dockerfile instructions along with a brief introduction of what is a Dockerfile and how we can leverage it to create customized images. Dockerfile plays an important role when building images and it automates the whole image-build process. We have covered all the major instructions that are frequently used in a dockerfile and we certainly hope that this will help you to create customized images more efficiently. Happy Learning!
People are also reading:
- What is Docker Compose?
- How to Install Docker Compose in Linux?
- How to create a Docker Compose file?
- Important Docker Compose Commands
- How to create a private registry for Docker?
- What is Docker Container Linking?
- Introduction to Docker Logging
- How to build Docker Images?
- Python Client Library API for Docker
- What is Docker Image?