A Docker image is a read-only template that includes instructions for building a Docker container. It gives you a simple way to package up the application and also provides pre-configured cloud environments that you can share privately or publicly with other Docker users. In this article, we are going to look at some of the most common and useful docker image commands. Before that, we must know how docker creates images and how we can leverage Dockerfiles to create them.
Layering in Docker Images and Dockerfiles
An Image layer is a set of files and metadata bundled and transmitted as a single independent entity. Docker handles each layer as an image internally, and layers are often referred to as intermediate files. You may also use labeling to promote a layer to an image. Most layers are built on top of a parent layer by modifying the parent's filesystem. A Dockerfile is a text file containing instructions that tell Docker how to make a new image. These files are distributed along with applications and it entirely depends upon the author of the image whether or not to embed them in the image.
Docker Image Commands
Here we have highlighted the important docker image commands in tabular which is quite good enough to be familiar with basics.
| docker image build | To build an image from a dockerfile |
| docker image history | Displays the history of an image |
| docker image import | To build a filesystem image, import the contents of a tarball. |
| docker image inspect | To display detailed info about one or more images. |
| docker image load | Use STDIN or a tar archive to load an image. |
| docker image ls | Used to list images. |
| docker image pull | Pull or download an image from the docker registry or a repository. |
| docker image push | Push or upload images to a repository or registry. |
| docker image rm | Used to remove images. |
| docker image tag | Make a TARGET IMAGE attribute that points to SOURCE IMAGE. |
1. Docker Image Build Command
A Dockerfile and a build context are used by the docker build command to create Docker images. The context of a build is the collection of files in the given PATH or URL. All of the files in the context can be referenced by the daemon process. A COPY command, for example, can be used in your build to refer to a file in the context. Git servers, pre-packaged tarball files, and plain text files are all examples of entities that can be referenced with the URL parameter in the syntax of the Docker build command. Let us create an nginx server using a Dockerfile.
FROM ubuntu:latest
EXPOSE 80
RUN apt-get update && \
    apt-get install nginx -y && \
    apt-get clean && rm -rf /var/lib/apt/lists/*
CMD ["nginx", "-g", "daemon off;"]
This is a typical format of a docker file and each instruction creates a layer on top of each other to create a final image. Here, Ubuntu is the base or parent image used for running the Nginx web server. Syntax :
$ docker image build [OPTIONS] PATH | URL | -
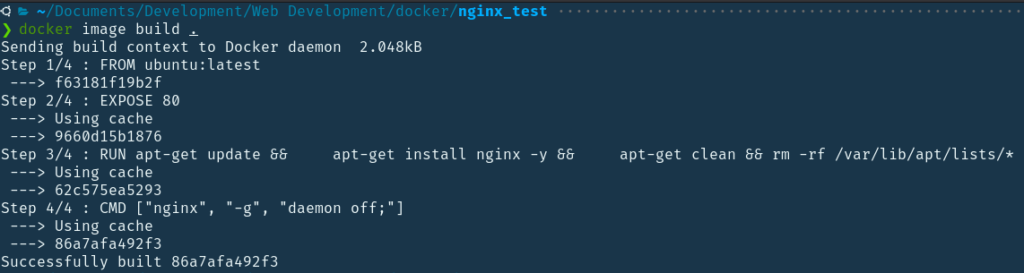
As you can see, the image is successfully built and can be used to run a container. Build command has a lot of options you can use to customize your image build. Options
| --tag or -t | Used to add a tag or naming container. |
| --memory or -m | To set the memory limit of the container when creating an image. |
| --no-cache | When building images, do not use cache build from scratch. |
| --pull | Always pull a newer version while building an image. |
2. Docker Image History Command
This command is used to see the history of an image build. Syntax :
$ docker image history [OPTIONS] IMAGE
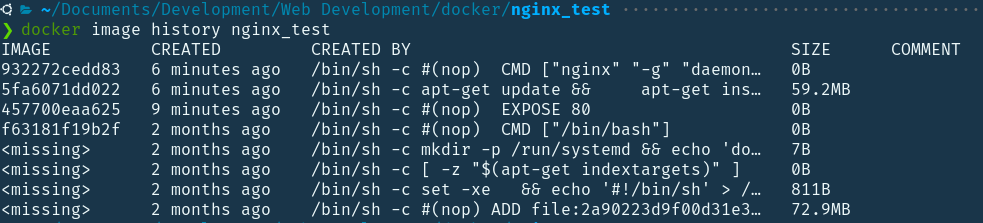
This lists out the history of intermediate layers while creating the final image. As you can see, there is an intermediate image for every instruction of the dockerfile. Options
| --format or -f | Formats the output about image history using a GO template. |
| --human or -H | Display the dates, sizes in a humanly understandable form. |
| --quite, -q | Only displays the image IDs |
Let’s use the format option to get only the image ID and which instructions have created it.

3. Docker Image Import Command
This command imports the contents of a tarball. You may take data directly from STDIN by specifying a URL or - (dash). The URL should point to a filesystem or server containing a tarball file (.tar,.tar.gz,.tgz,.bzip,.tar.xz, or.txz). Docker always extracts an archive in the container relative to the root directory. You must define the entire path inside the host if you specify a single file. To specify a URL, start with the http:// or https:// protocol to import from a remote place. To create a new untagged image you can use the command:
$ docker image import http://www.github.com/exampleimageimport.tgz
This will import or download the file from github, unzip or unrar it and build an image. Or you can do the same with the file in your local filesystem. Options :
| --change or -c | The —change option applies Dockerfile instructions to the generated images, like CMD, ENTRYPOINT, USER, etc. |
| --message or -m | This is used to set a commit message for the imported image. |
4. Docker Image Inspect Command
This command displays some low-level details about an image, such as its creation date or creator and some other details as well. It prints out a JSON formatted array by default. Syntax :
$ docker image inspect [OPTIONS] IMAGE [IMAGE...]
Options :
| --format or -f | Formats the output about image history using a GO template. |
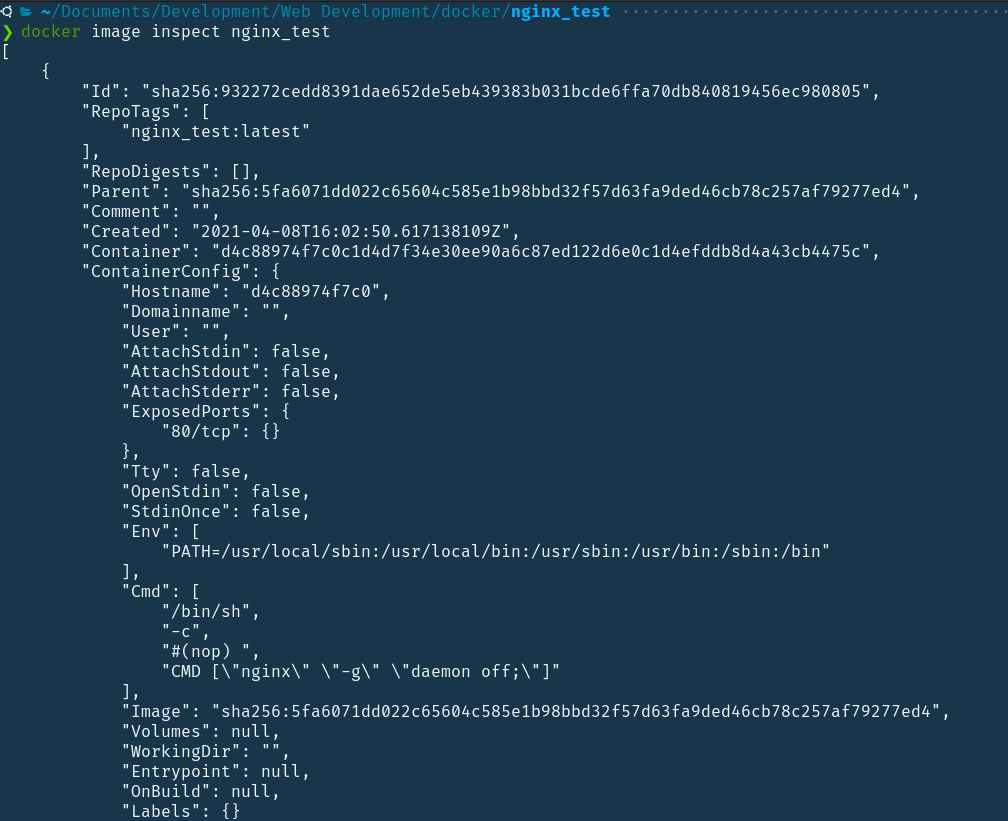
This command returns a JSON array that has details such as the Image ID, the parent image of this particular image, the repo-tags which we specified in the earlier section using -t. You can get the image name of the image use the below command:
$ docker inspect --format='{{.Config.Image}}' $INSTANCE_ID

This gives us the name base image or the parent image used in the dockerfile to build this image.
5. Docker Image Ls Command
This command is used to list out the images in your local machine. Syntax :
$ docker image ls [OPTIONS] [REPOSITORY[:TAG]]
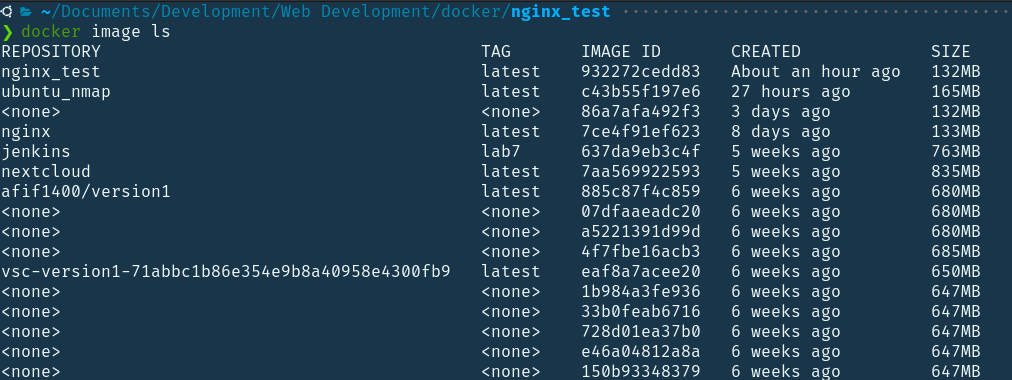
The normal command lists out the images excluding the intermediate images. Options :
| --all or -a | This lists out all the images including the intermediate images. |
| --filter or -f | To list out the images based on certain filters. |
| --format | Formats the output about image history using a GO template. |
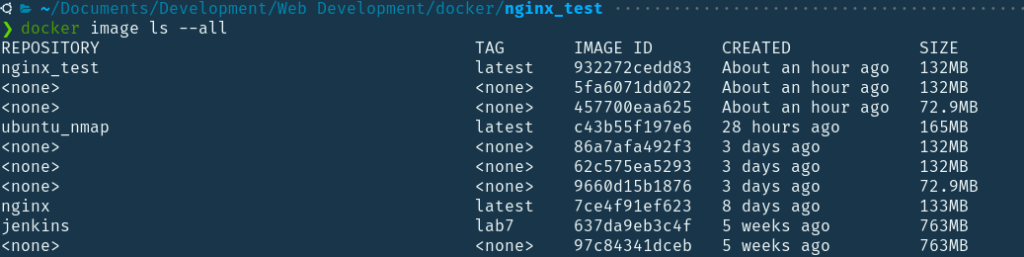
As you can see, the output of this command lists all the images including the dangling ones.
6. Docker Image Pull Command
This is used to pull images from a repository or the docker registry. Syntax :
$ docker image pull [OPTIONS] NAME[:TAG|@DIGEST]
When you pull images, it gets saved in your local storage. When you build a custom image, it first searches in the local repo. If it finds a match, it uses that image and if not, it pulls it from the remote repo or registry. Let us pull an interesting image from the docker registry, called jturpin/hollywood which simulates the hacker screen in Hollywood movies. After pulling the image, we can use the docker run command to run that image in a container.
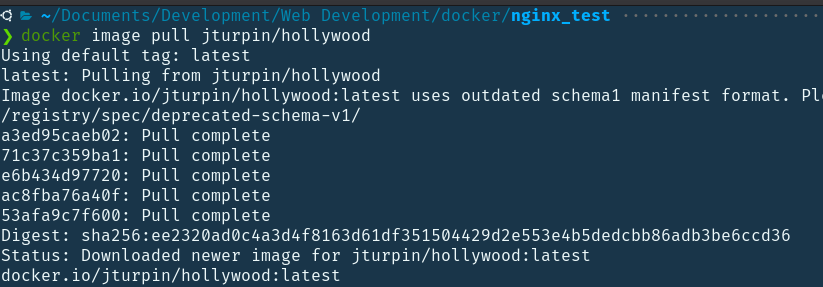
$ docker run -it jturpin/hollywood hollywood
Press CTRL+C to exit and then you will land in its shell, type exit to get out of the terminal.
7. Docker Image Push Command
Docker containers are portable because we can push or upload our images to the docker hub. Before pushing our images to the Docker hub, we need to create an account on the Docker hub and login from our terminal to the remote account so that the docker daemon pushes our image to the appropriate repository.
$ docker login
You can use this command to log in to docker. You will be prompted to enter the username and password, so enter the same ones which you used to create an account on docker hub. While pushing an image you need to tag it with a prefix of your username on the docker hub. Hence, the name of the image that will be pushed is - username/image_name. Syntax :
$ docker image push [OPTIONS] NAME[:TAG]
Options:
| --all-tags | This option is used when you need to push all the tagged images of that particular name. |
| --quite | This suppresses the verbose in the output. |
8. Docker Image Rm Command
We can use this command to remove one or more images from the local machine. Syntax :
$ docker image rm [OPTIONS] IMAGE [IMAGE...]
When we execute the docker image ls command, we get a list of images along with their names and image IDs that can be used to remove them. Now, let's remove the ubuntu_nmap image and the nextcloud image.

Execute the command:
$ docker image rm ubuntu_nmap nextcloud

This deleted all the intermediate images and the final image as well.
9. Docker Image Tag Command
Tags are just metadata that we can give to an image. It helps us to keep track of image versions. It can contain lowercase and uppercase characters, numbers, underscores, periods, and dashes. A tag name can't begin with a period or a slash, and it can only be 128 characters long. You can use names and tags to organize your images before uploading them to Docker Hub's repositories.

We can tag the Jenkins image with a repository name and its version.
$ docker image tag IMAGE_ID repo_name/version
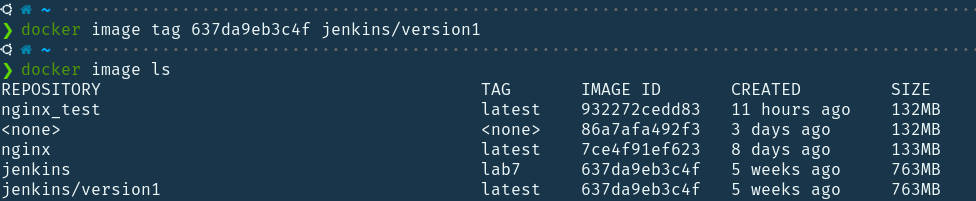
We can see in the above image that there are two images, the first one is the original Jenkins image and the second one is the image that we created just now with a new tag. You can also use the image name instead of the image ID and usually the repo name used is the username of docker hub, stating that it belongs to your repository.
Conclusion
In this article, we started with a basic explanation about docker images and the image layering concept. After that, we defined what Dockerfiles are and their role in image creation. Then we deep-dived into several docker image commands which are very necessary to build docker images and also maintain or debug them. We certainly hope that you are now able to get hands-on with important Docker Image Commands. Happy Learning!
People are also reading:
- What is Docker Networking?
- What is Docker Swarm?
- What are Docker Storage Drivers?
- What is Docker Container Linking?
- What is Docker Logging?
- Difference between Docker Images and Container
- Docker Interview Questions
- How to Use a Dockerfile to Build Docker Images?
- How to list Docker Images?
- How to Search Docker Images using CLI?