Docker has become an important aspect of the deployment of software applications. It helps in reducing complexities that occur in the different phases of software development , from development to deployment, in the case of different environments, and brings portability to the picture. This eventually means that developers can now focus more on the development part rather than worrying about whether their software is going to work in production or not due to issues related to dependencies and environment configuration differences.
Earlier, I have covered how you can set up docker on Windows 11? and some basic terminologies that you should know before starting with this tutorial.
You can refer to my previous blog here.
In this blog post, we will learn some basic Docker commands with their examples. We will be using Windows Powershell to run our Docker commands on Windows.
To start with, any command I can run on the terminal. I always prefer to first look at the help section.
docker help
You can use the help option to see the various options and commands that one can use with Docker.
Syntax:
docker --help
Output:
Usage: docker [OPTIONS] COMMAND
A self-sufficient runtime for containers
Options:
|
--config string |
Location of client config files (default "C:\\Users\\avyuk\\.docker") |
|
-c, --context string |
Name of the context to use to connect to the daemon (overrides DOCKER_HOST env var and default context set with "docker context use") |
|
-D, --debug |
Enable debug mode |
|
-H, --host list |
Daemon socket(s) to connect to |
|
-l, --log-level string |
Set the logging level ("debug"|"info"|"warn"|"error"|"fatal") (default "info") |
|
--tls |
Use TLS; implied by --tlsverify |
|
--tlscacert string |
Trust certs signed only by this CA (default "C:\\Users\\avyuk\\.docker\\ca.pem") |
|
--tlscert string |
Path to TLS certificate file (default "C:\\Users\\avyuk\\.docker\\cert.pem") |
|
--tlskey string |
Path to TLS key file (default "C:\\Users\\avyuk\\.docker\\key.pem") |
|
--tlsverify |
Use TLS and verify the remote |
|
-v, --version |
Print version information and quit |
Management Commands:
|
builder |
Manage builds |
|
buildx* |
Docker Buildx (Docker Inc., v0.9.1) |
|
compose* |
Docker Compose (Docker Inc., v2.10.2) |
|
config |
Manage Docker configs |
|
container |
Manage containers |
|
context |
Manage contexts |
|
extension* |
Manages Docker extensions (Docker Inc., v0.2.9) |
|
image |
Manage images |
|
manifest |
Manage Docker image manifests and manifest lists |
|
network |
Manage networks |
|
node |
Manage Swarm nodes |
|
plugin |
Manage plugins |
|
sbom* |
View the packaged-based Software Bill Of Materials (SBOM) for an image (Anchore Inc., 0.6.0) |
|
scan* |
Docker Scan (Docker Inc., v0.19.0) |
|
secret |
Manage Docker secrets |
|
service |
Manage services |
|
stack |
Manage Docker stacks |
|
swarm |
Manage Swarm |
|
system |
Manage Docker |
|
trust |
Manage trust on Docker images |
|
volume |
Manage volumes |
Commands:
|
attach
|
Attach local standard input, output, and error streams to a running container |
|
build |
Build an image from a Dockerfile |
|
commit |
Create a new image from a container's changes |
|
cp |
Copy files/folders between a container and the local filesystem |
|
create |
Create a new container |
|
diff |
Inspect changes to files or directories on a container's filesystem |
|
events |
Get real time events from the server |
|
exec |
Run a command in a running container |
|
export |
Export a container's filesystem as a tar archive |
|
history |
Show the history of an image |
|
images |
List images |
|
import |
Import the contents from a tarball to create a filesystem image |
|
info |
Display system-wide information |
|
inspect |
Return low-level information on Docker objects |
|
kill |
Kill one or more running containers |
|
load |
Load an image from a tar archive or STDIN |
|
login |
Log in to a Docker registry |
|
logout |
Log out from a Docker registry |
|
logs |
Fetch the logs of a container |
|
pause |
Pause all processes within one or more containers |
|
port
|
List port mappings or a specific mapping for the container |
|
ps |
List containers |
|
pull |
Pull an image or a repository from a registry |
|
push |
Push an image or a repository to a registry |
|
rename |
Rename a container |
|
restart |
Restart one or more containers |
|
rm |
Remove one or more containers |
|
rmi |
Remove one or more images |
|
run |
Run a command in a new container |
|
save |
Save one or more images to a tar archive (streamed to STDOUT by default) |
|
search |
Search the Docker Hub for images |
|
start |
Start one or more stopped containers |
|
stats |
Display a live stream of container(s) resource usage statistics |
|
stop |
Stop one or more running containers |
|
tag |
Create a tag TARGET_IMAGE that refers to SOURCE_IMAGE |
|
top
|
Display the running processes of a container |
|
unpause |
Unpause all processes within one or more containers |
|
update |
Update configuration of one or more containers |
|
version |
Show the Docker version information |
|
wait |
Block until one or more containers stop, then print their exit codes |
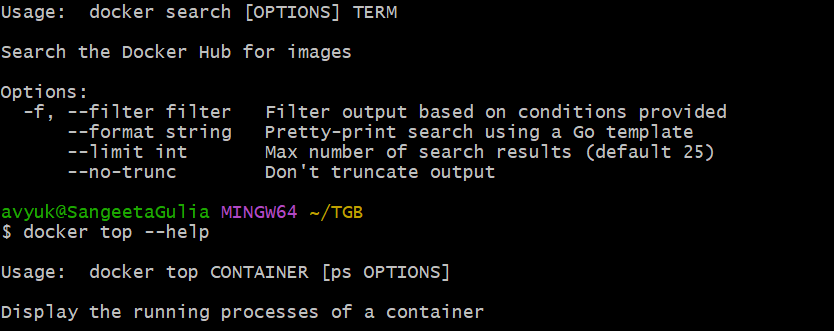
docker COMMAND --help
You can also find options for each command by looking into the help section of individual command using above syntax.
Example:
docker search --help
The List of Popular Docker Commands
Let us now begin with the discussion of the most-used and popular Docker commands that you must know while working with Docker.
1. docker search
The docker search command is going to search the docker hub for images.
Syntax:
docker search <imagename>
Command:
docker search java
Output:

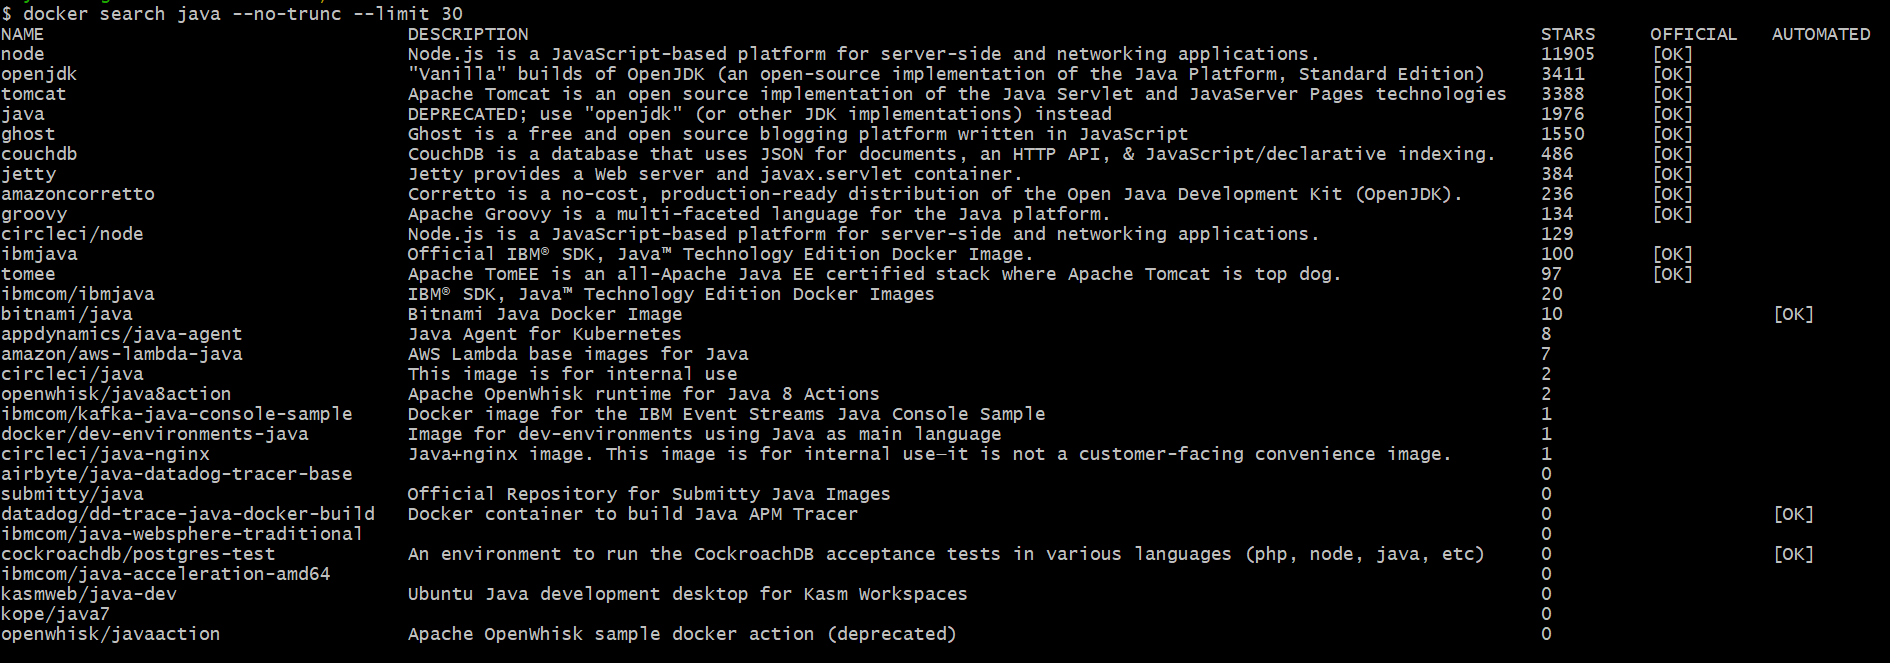
The -- no-trunc flag is used to see the complete description in the above command. If not used, the description will be truncated. The above command searched and found all the Java distributions that are available in the Docker Hub registry.
Also, note that we have seen only 25 records since it is the default limit. To increase the limit, you can run the below command:
docker search java --no-trunc --limit 30
Output:
2. Docker version
Use this command to check the version of Docker installed on your system.
Syntax:
docker --version
Example:

3. Docker pull command
The Docker pull command can be used to pull the available Docker images from the Docker Hub registry.
Syntax:
docker --pull
Docker pull works in two ways:
-
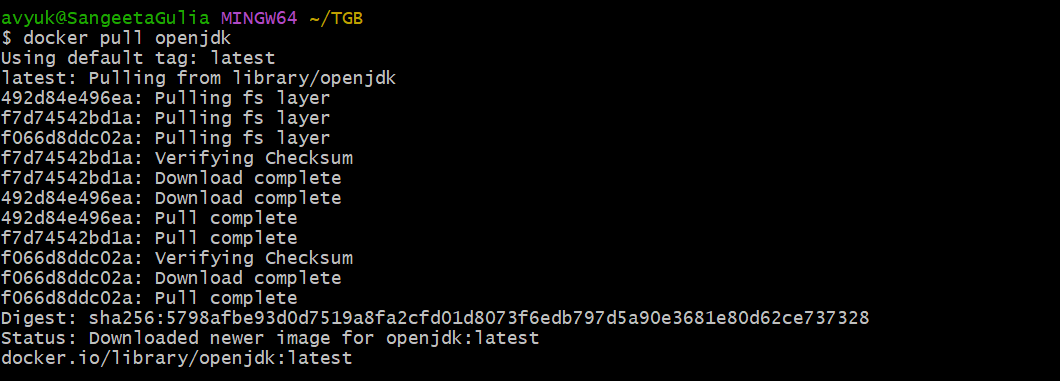
docker pull <imagename>
The above command will pull the image with the given name with the latest tag.
Example:
-
docker pull <imagename>:<tagname>
Example:

The above syntax will help to pull the specific version of that image as specified using tagname.
Note: To search for available tags, you can search the web. You will find the information on the Docker Hub pages as follows:
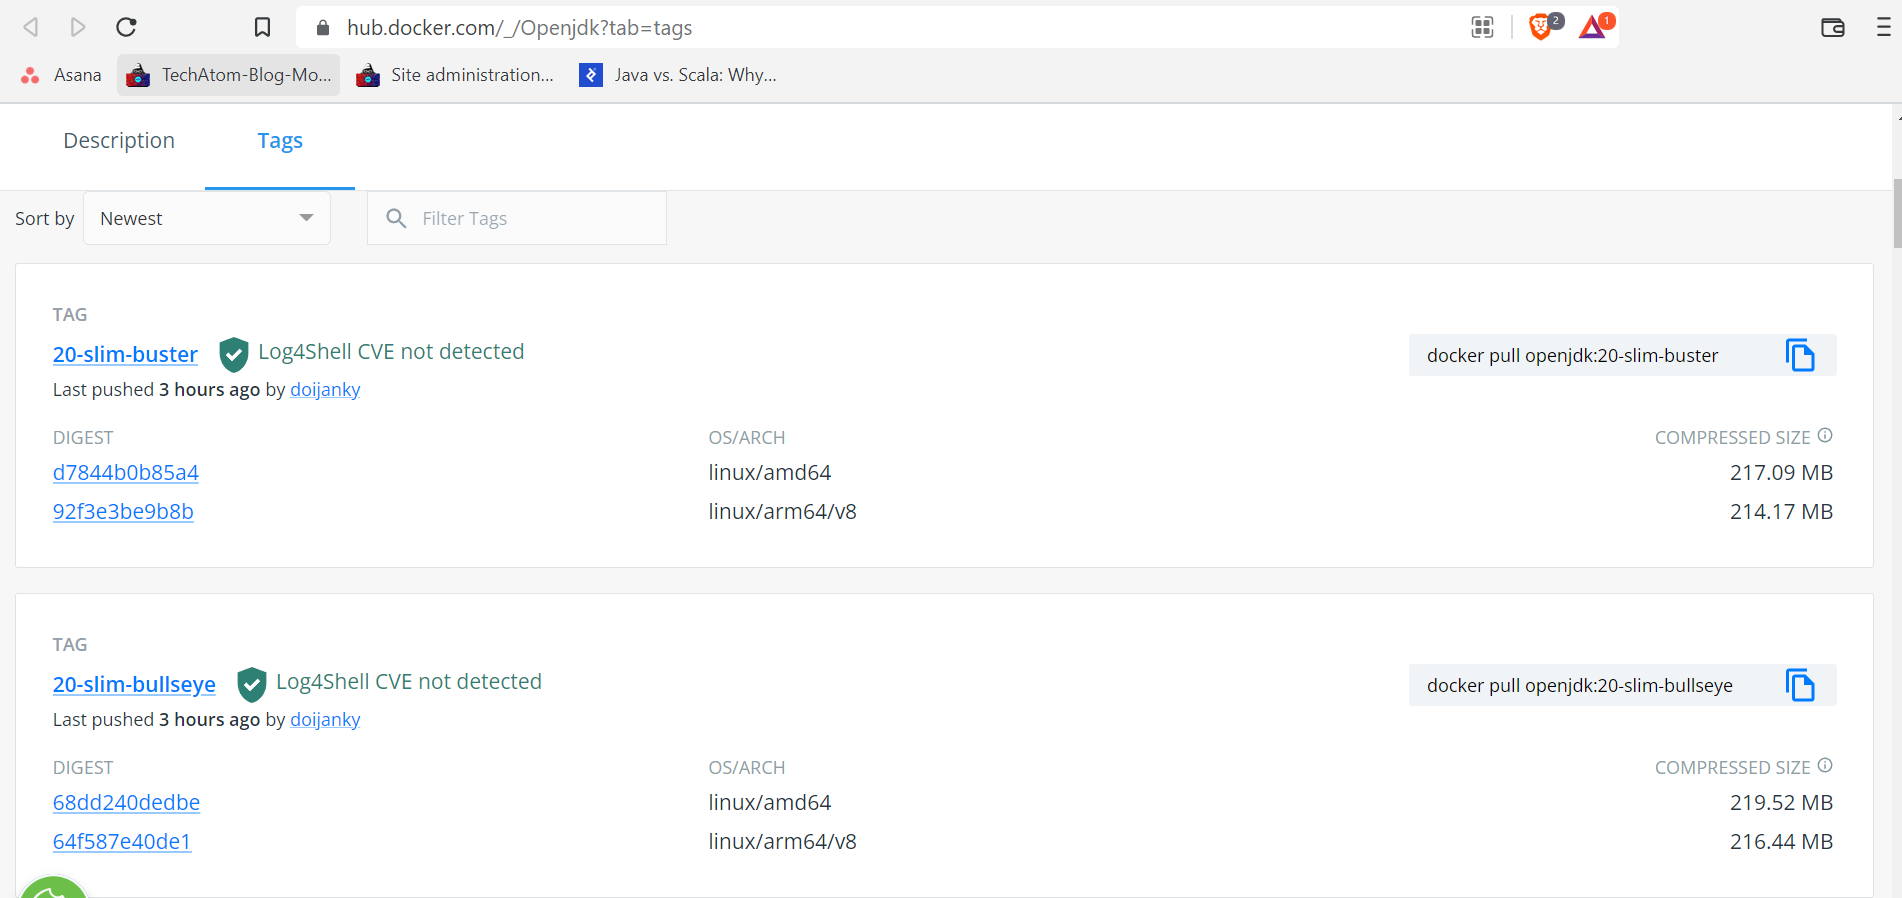
4. docker images
This command helps to list all the Docker Images available on your local system.
Syntax:
docker images
As per the tutorial flow, we have pulled two images of OpenJDK. So, we should be able to see only two images, one with the latest tag and another with the 20-oraclelinux8 tag.

5. docker rmi
You can use this command to delete Docker Images from local. You can remove one or many images by passing the names of the images.
Syntax:
docker rmi [OPTIONS] IMAGE [IMAGE...]
Example:
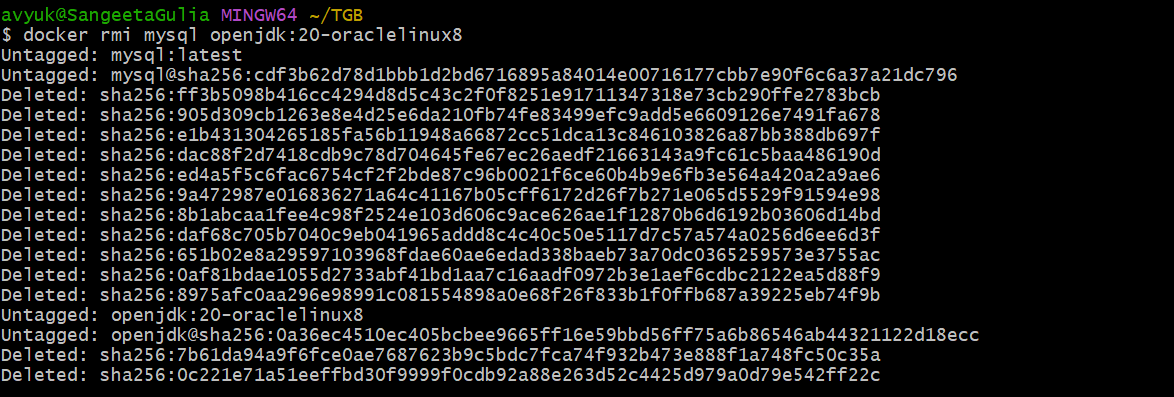
In the above example, I have removed two images where the image names are space separated.
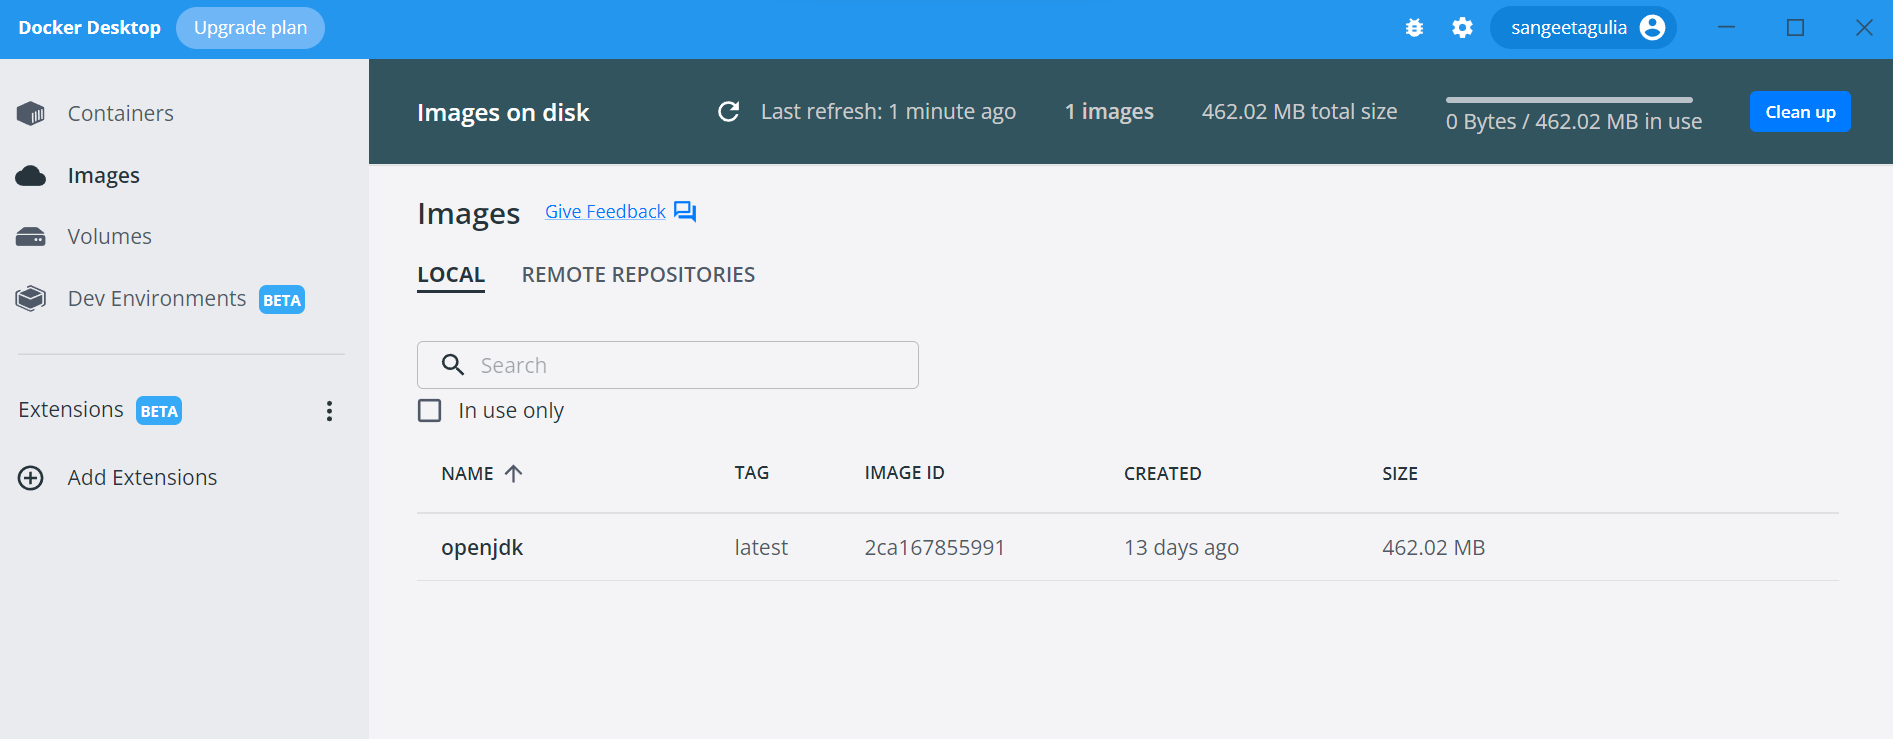
You can also remove Docker Images from the Docker desktop using the “Clean up” button in the Images tab as per the below screenshot:
6. docker run
This command is used to run an image in a container.
Syntax:
docker run [OPTIONS] IMAGE [COMMAND] [ARG...]
Example:
|
PS C:\Users\avyuk> docker run -it ubuntu |
Output:
Unable to find image 'ubuntu:latest' locally
latest: Pulling from library/ubuntu
2b55860d4c66: Pull complete
Digest: sha256:20fa2d7bb4de7723f542be5923b06c4d704370f0390e4ae9e1c833c8785644c1
Status: Downloaded newer image for ubuntu:latest
root@dd984bb81945:/#
In the above example, we need to notice a few points:
1) If we are running an image that does not exist locally, it tries to fetch it from the Docker Hub registry and execute it if it is able to find it there.
2) We have interactively executed the command (using -it flag), which means after the image is run in a container, we will enter into the container. This can be seen since the last line is pointing to the root user while we were working from “PS C:\Users\avyuk”
You can play around inside the container now until the container is alive.
Example:
root@dd984bb81945:/# ls
bin boot dev etc home lib lib32 lib64 libx32 media mnt opt proc root run sbin srv sys tmp usr var
root@dd984bb81945:/# touch fileInContainer.txt
root@dd984bb81945:/# echo "Hey I have created a file in the container. This file is alive until the container is alive." > fileInContainer.txt root@dd984bb81945:/# cat fileInContainer.txt
Hey I have created a file in the container. This file is alive until the container is alive.
We will now try to learn some other docker commands that will continue to the above example, which we have used to create a container using docker run.
You can provide meaningful names to your container using the --name flag below. If the name is not provided, the daemon generates a random name for you.

Output:

The following are the other options that you can use with the docker run command:
Options:
|
--add-host list
|
Add a custom host-to-IP mapping (host:ip) |
|
-a, --attach list |
Attach to STDIN, STDOUT or STDERR |
|
--blkio-weight uint16 |
Block IO (relative weight), between 10 and 1000, or 0 to disable (default 0) |
|
--blkio-weight-device list |
Block IO weight (relative device weight) (default []) |
|
--cap-add list |
Add Linux capabilities |
|
--cap-drop list |
Drop Linux capabilities |
|
--cgroup-parent string |
Optional parent cgroup for the container |
|
--cgroupns string |
Cgroup namespace to use (host|private)
Default-cgroupns-mode option on the daemon (default) |
|
--cidfile string |
Write the container ID to the file |
|
--cpu-period int |
Limit CPU CFS (Completely Fair Scheduler) period |
|
--cpu-quota int |
Limit CPU CFS (Completely Fair Scheduler) quota |
|
--cpu-rt-period int |
Limit CPU real-time period in microseconds |
|
--cpu-rt-runtime int |
Limit CPU real-time runtime in microseconds |
|
-c, --cpu-shares int |
CPU shares (relative weight) |
|
--cpus decimal |
Number of CPUs |
|
--cpuset-cpus string |
CPUs in which to allow execution (0-3, 0,1) |
|
--cpuset-mems string |
MEMs in which to allow execution (0-3, 0,1) |
|
-d, --detach |
Run container in background and print container ID |
|
--detach-keys string |
Override the key sequence for detaching a container |
|
--device list |
Add a host device to the container |
|
--device-cgroup-rule list |
Add a rule to the cgroup allowed devices list |
|
--device-read-bps list |
Limit read rate (bytes per second) from a device (default []) |
|
--device-read-iops list |
Limit read rate (IO per second) from a device (default []) |
|
--device-write-bps list |
Limit write rate (bytes per second) to a device (default []) |
|
--device-write-iops list |
Limit write rate (IO per second) to a device (default []) |
|
--disable-content-trust |
Skip image verification (default true) |
|
--dns list |
Set custom DNS servers |
|
--dns-option list |
Set DNS options |
|
--dns-search list |
Set custom DNS search domains |
|
--domainname string |
Container NIS domain name |
|
--entrypoint string |
Overwrite the default ENTRYPOINT of the image |
|
-e, --env list |
Set environment variables |
|
--env-file list |
Read in a file of environment variables |
|
--expose list |
Expose a port or a range of ports |
|
--gpus gpu-request |
GPU devices to add to the container ('all' to pass all GPUs) |
|
--group-add list |
Add additional groups to join |
|
--health-cmd string |
Command to run to check health |
|
--health-interval duration |
Time between running the check (ms|s|m|h) (default 0s) |
|
--health-retries int |
Consecutive failures needed to report unhealthy |
|
--health-start-period duration |
Start period for the container to initialize before starting health-retries countdown (ms|s|m|h) (default 0s) |
|
--health-timeout duration |
Maximum time to allow one check to run (ms|s|m|h) (default 0s) |
|
--help |
Print usage |
|
-h, --hostname string |
Container host name |
|
--init |
Run an init inside the container that forwards signals and reaps processes |
|
-i, --interactive |
Keep STDIN open even if not attached |
|
--ip string |
IPv4 address (e.g., 172.30.100.104) |
|
--ip6 string |
IPv6 address (e.g., 2001:db8::33) |
|
--ipc string |
IPC mode to use |
|
--isolation string |
Container isolation technology |
|
--kernel-memory bytes |
Kernel memory limit |
|
-l, --label list |
Set meta data on a container |
|
--label-file list |
Read in a line delimited file of labels |
|
--link list |
Add link to another container |
|
--link-local-ip list |
Container IPv4/IPv6 link-local addresses |
|
--log-driver string |
Logging driver for the container |
|
--log-opt list |
Log driver options |
|
--mac-address string |
Container MAC address (e.g., 92:d0:c6:0a:29:33) |
|
-m, --memory bytes |
Memory limit |
|
--memory-reservation bytes |
Memory soft limit |
|
--memory-swap bytes |
Swap limit equal to memory plus swap: '-1' to enable unlimited swap |
|
--memory-swappiness int |
Tune container memory swappiness (0 to 100) (default -1) |
|
--mount mount |
Attach a filesystem mount to the container |
|
--name string |
Assign a name to the container |
|
--network network |
Connect a container to a network |
|
--network-alias list |
Add network-scoped alias for the container |
|
--no-healthcheck |
Disable any container-specified HEALTHCHECK |
|
--oom-kill-disable |
Disable OOM Killer |
|
--oom-score-adj int |
Tune host's OOM preferences (-1000 to 1000) |
|
--pid string |
PID namespace to use |
|
--pids-limit int |
Tune container pids limit (set -1 for unlimited) |
|
--platform string |
Set platform if server is multi-platform capable |
|
--privileged |
Give extended privileges to this container |
|
-p, --publish list |
Publish a container's port(s) to the host |
|
-P, --publish-all |
Publish all exposed ports to random ports |
|
--pull string |
Pull image before running ("always"|"missing"|"never") (default "missing") |
|
--read-only |
Mount the container's root filesystem as read only |
|
--restart string |
Restart policy to apply when a container exits (default "no") |
|
--rm |
Automatically remove the container when it exits |
|
--runtime string |
Runtime to use for this container |
|
--security-opt list |
Security Options |
|
--shm-size bytes |
Size of /dev/shm |
|
--sig-proxy |
Proxy received signals to the process (default true) |
|
--stop-signal string |
Signal to stop a container (default "15") |
|
--stop-timeout int |
Timeout (in seconds) to stop a container |
|
--storage-opt list |
Storage driver options for the container |
|
--sysctl map |
Sysctl options (default map[]) |
|
--tmpfs list |
Mount a tmpfs directory |
|
-t, --tty |
Allocate a pseudo-TTY |
|
--ulimit ulimit |
Ulimit options (default []) |
|
-u, --user string |
Username or UID (format:<name|uid>[:<group|gid>]) |
|
--userns string |
User namespace to use |
|
--uts string |
UTS namespace to use |
|
-v, --volume list |
Bind mount a volume |
|
--volume-driver string |
Optional volume driver for the container |
|
--volumes-from list |
Mount volumes from the specified container(s) |
|
-w, --workdir string |
Working directory inside the container |
7. docker ps
This command lists all the running containers.
Syntax:
docker ps [OPTIONS]
Example:

Please note that you will be running Docker commands in your system and not in the container.
Here are some important options that you can use with the docker ps command:
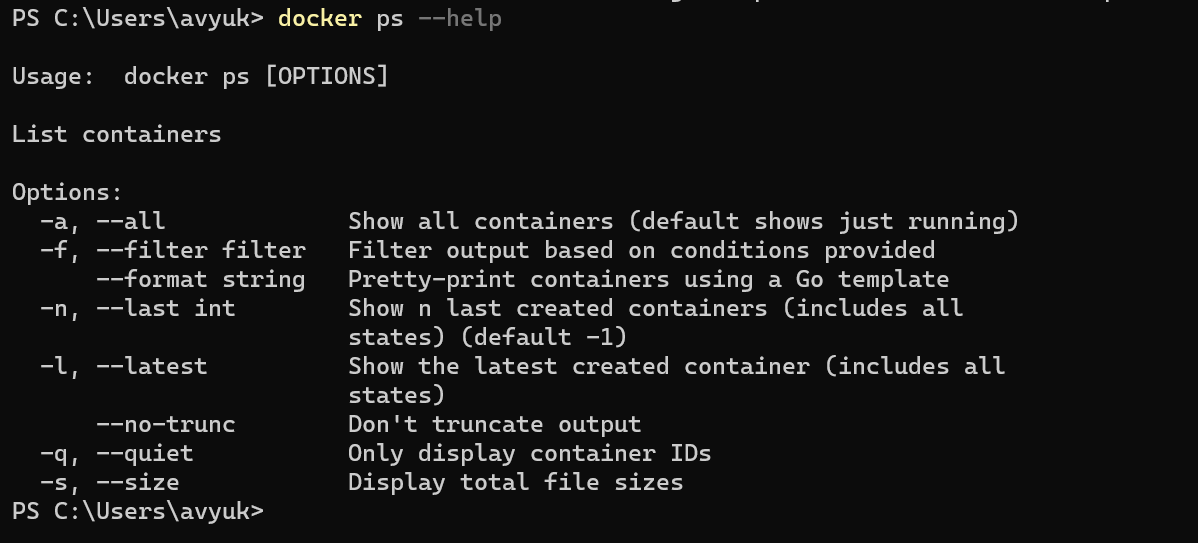
Note: docker ps -a will show all containers while the default command will just show the running containers.
The other options that you can use with docker ps are as follows:
|
-a, --all |
Show all containers (default shows just running) |
|
-f, --filter filter |
Filter output based on conditions provided |
|
--format string |
Pretty-print containers using a Go template |
|
-n, --last int |
Show n last created containers (includes all states) (default -1) |
|
-l, --latest |
Show the latest created container (includes all states) |
|
--no-trunc |
Don't truncate output |
|
-q, --quiet |
Only display container IDs |
|
-s, --size |
Display total file sizes |
8. docker stop
Use this command to stop a running container. Docker stop will either need the container name or container id as an argument. With this command, you can stop one or many containers:
Syntax:
docker stop [OPTIONS] CONTAINER [CONTAINER...]
Example:

This will exit the container on another terminal as follows:

Once the container has exited, you will only be able to list the container using docker ps -a since the status of the container has been changed from running to the exit.

9. docker restart
The docker restart command restarts a stopped container. Below is an example of how you can use this command. With this command, you can restart one or many containers.
Syntax:
docker restart [OPTIONS] CONTAINER [CONTAINER...]
Example:

Conclusion
In this blog, we have covered the basic commands to kick-start with docker. Stay tuned with us for more docker-related blogs. We will be covering how to create your custom docker image in the next blog series using docker build and docker tag commands.
Thanks for reading. Happy learning :)
People are also reading:


